Learn to fly your canopy with understanding, share airspace responsibly, choose and care for your equipment, and build the judgment and currency to keep progressing.
After getting a skydiving license, it is natural to think about what comes next. Your first formation jump. Better freefall skills. A new discipline. Time in a wind tunnel, or a freefall skills camp with a coach.
That enthusiasm is a good thing. Freefall is exciting, demanding, and worth learning well.
But there is another part of every skydive that can receive much less attention: the time you spend flying your parachute.
Once the canopy opens, it is tempting to think the difficult part is over. You steer back, follow a landing pattern, flare, and start packing for the next jump. The canopy becomes transportation rather than an aircraft you are still learning to fly.
The difference in how we invest in these skills can be striking. A jumper might spend hours in a wind tunnel refining a freefall position while rarely arranging a coached canopy jump, a landing-video review, or a canopy course. This is not true of everyone or every drop zone, but it is a pattern worth challenging.
Your canopy deserves deliberate progression too.
A license establishes a foundation. It does not mean you have finished learning to fly a wing, judge its limits, navigate shared airspace, or make good landing decisions when the original plan stops working.
Canopy coaching is part of progression
Wind tunnels and freefall camps can accelerate learning because they provide structured practice, observation, and feedback. Canopy coaching, canopy courses, and canopy camps deserve the same consideration. They give you opportunities to explore how your wing behaves, practice appropriate skills under supervision, and learn from feedback rather than from the outcome of a landing alone.
A well-planned canopy training day might involve discussing a maneuver on the ground, observing a predictable response at safe altitude, reviewing video of a landing, and comparing what actually happened with what you expected. Over several jumps, small observations can turn into genuine understanding.
You do not have to be interested in swooping, competition, or highly loaded canopies to benefit. Learning to fly an ordinary canopy precisely, navigate among other jumpers, and make conservative decisions is worthwhile in its own right.
Investing in canopy skills is not a distraction from becoming a better skydiver. It is part of becoming one.
Independence also means choosing well
Canopy piloting is only part of the transition after licensing. You may soon need to decide whether to keep renting or buy a rig, which canopy suits you, and what to do when somebody suggests downsizing. Eventually, you may return after a long break or become responsible for inspecting, packing, and caring for your own equipment.
These are not just purchasing or maintenance questions. The canopy you choose changes the aircraft you fly. Jumping infrequently may change how prepared you are to fly it. A rig that fits poorly, has an unresolved equipment issue, or demands skills you have not developed is not made suitable by enthusiasm or a bargain price.
Becoming more independent therefore means learning when to progress, when to wait, what to check, and when to ask for qualified help. Owning equipment or accumulating jump numbers is not the same as developing proficiency.
What this handbook covers
Independent Skydiver Core is written primarily for recently licensed jumpers—particularly those with around 25–50 jumps—who can land a parachute but want to understand why it behaves the way it does and how to make better decisions throughout a skydive. More experienced jumpers may also find useful explanations and questions here.
Part I — Canopy Flight & Control builds a mental model of the wing and suspended pilot. It explains aerodynamic forces, wing loading, control inputs, the flight cycle, turns, stalls, energy, glide, flare, and landing.
Part II — Canopy Airmanship puts that aircraft in shared airspace. It explores separation, holding areas, arrival timing, landing patterns, traffic conflicts, changing wind, and the decisions that preserve safe landing options.
Part III — Equipment, Progression & Currency moves from flying the canopy to choosing and looking after the equipment you fly. It covers buying a first rig, choosing a suitable canopy, downsizing decisions, maintaining currency, and understanding owner checks, care, and the limits of what you should do without a qualified rigger.
This is intentionally not another freefall skills manual. Freefall skills matter, and decisions made before deployment affect canopy traffic; we address those connections where relevant. Our focus is on the skills and responsibilities that can too easily become an afterthought once a license is earned.
How to use it
Read at your own pace. There is no required jump-by-jump syllabus, and you do not need to finish the handbook in a weekend. The chapters build on one another, so early concepts become tools for understanding later flight situations and equipment decisions.
Think about it asks you to predict or explain something before looking for the answer.
Try it in the air describes a topic for planned, qualified instruction or canopy coaching—never a suggestion to improvise a maneuver on your next jump.
Useful simplification identifies a teaching model that helps without describing every aerodynamic detail.
Dangerous half-truth examines an appealing rule of thumb that can fail in real conditions.
The best outcome is not that you can recite every paragraph. It is that you notice more while flying, ask better questions, and make equipment and progression decisions you can explain—not simply defend because they worked out once.
Safety and scope
This handbook does not replace first-jump training, manufacturer instructions, current local procedures, or a qualified instructor's or rigger's judgment. Emergency procedures, decision altitudes, and landing practices must be learned and applied under the rules and conditions of your equipment and drop zone. Exercises involving unfamiliar riser input, stalls, or unusual flight states require a suitable wing, planned altitude margins, clear airspace, and appropriate supervision. Equipment compatibility, inspections, and repairs require the applicable manufacturer guidance and qualified assistance. No high-performance landing, low-turn, or rigging training is provided.
PART I / CHAPTER 00Part I · Foundations
0. The Big Picture
Before we look closely at aerodynamics or individual controls, it helps to have a low-resolution map of the entire system.
You are hanging underneath a flying wing. The wing moves through air, has airspeed, follows a flight path, produces aerodynamic forces, and carries energy. You and the canopy are connected, but you are not one rigid object. You can influence the system primarily through four control methods: toggles, rear risers, front risers, and harness. Each changes the system in a different way. And whenever you make a control input, something easy to forget happens: the canopy may continue reacting after you stop making the input. We call this continuing response the flight cycle. Chapter 2 will make it concrete with the familiar experience of releasing brakes.
Much of canopy piloting can be understood through that single idea.
From passenger to pilot
It is easy to think of the canopy as “the thing that gets me from deployment to the ground.” That model is useful in the beginning, but it is not enough if you want to become a competent canopy pilot. A better model is: The canopy is an aircraft, and I am its pilot. It has a flight path; airspeed; lift and drag; pitch, roll, and yaw; control inputs; performance limits; energy; inertia; and traffic around it. It happens to be made mostly of fabric and lines. It still obeys the physics of flight.
One limit you will hear about is a stall: a breakdown of the wing's normal aerodynamic lift. It is not simply another word for flying slowly. We will explain what causes stalls and how they develop in Chapter 14.
Four questions worth asking repeatedly
What is the wing doing? Is it speeding up, slowing down, rolling, pitching, changing descent rate, or changing its flight path?
What is my body doing relative to the wing? Am I hanging in its usual position, swinging behind it, moving ahead of it, or moving outward during a turn?
What energy does the system have? Is it diving, accelerating, or recently slowed? Has altitude been converted into speed?
What happens next? If I release the control now, does the canopy immediately return to ordinary flight or still need time and altitude to recover? This last question leads us to one of the central ideas in canopy control: the flight cycle.
FIGURE 01Photograph · CC0
A ram-air canopy and its pilotAn inflated ram-air canopy, suspension lines, and the jumper hanging beneath the wing.Photo: SkydivePhoto / Wikimedia Commons · CC0 1.0
PART I / CHAPTER 01Part I · Foundations
1. What Is Actually Flying?
1.1 A ram-air parachute is a gliding wing
Once inflated, a ram-air canopy behaves as a flexible wing. In normal flight it moves both forward through the air and downward through the air. Together these produce a descending flight path. The canopy is not simply falling while also moving forward. It is gliding. In an ordinary, steady glide, forward travel comes with a loss of altitude. The balance depends on the canopy, its wing loading (total suspended weight relative to wing area), its trim (how it is set up to fly with the controls released), control inputs, and the air around it. We will explore those factors separately.
1.2 Why doesn't the canopy simply fall vertically?
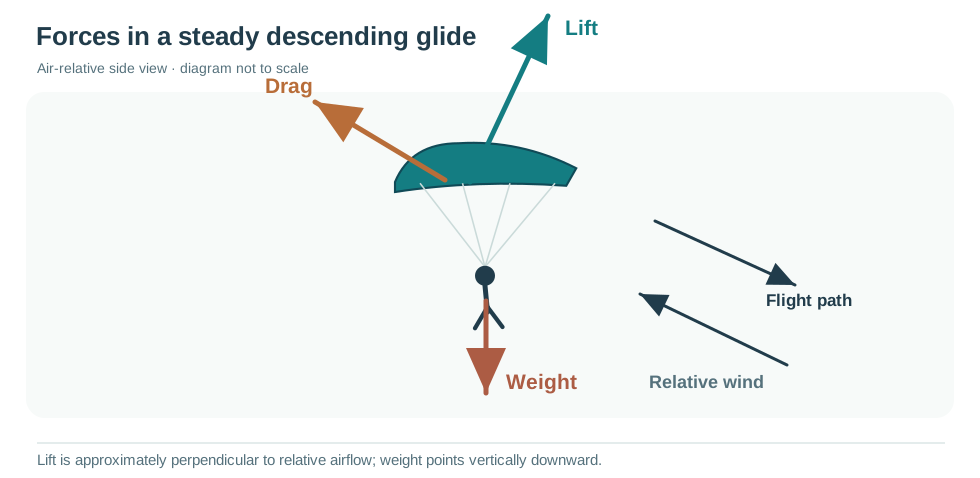
The wing interacts with surrounding air and produces aerodynamic forces. Two of the most useful are lift, conventionally described as acting approximately perpendicular to the relative airflow, and drag, acting approximately opposite motion through the air. Gravity acts as well. Together these forces determine the flight path. You do not need to calculate them, but you do need to recognize that changing the wing's shape, attitude, or speed changes its aerodynamic forces.
FIGURE 02Editable vector diagram
Forces In Gliding FlightConceptual force diagram: lift approximately perpendicular to relative wind, drag approximately opposite air-relative motion, and weight downward. Arrows are schematic, not to scale.
1.3 Where does lift come from?
You may have heard that air going over the curved top of the wing has farther to travel and therefore must go faster to rejoin the air underneath at the trailing edge. There is no such equal-transit-time requirement. A better simplified picture is that the wing creates a pressure distribution and changes the direction and momentum of surrounding airflow; the resulting aerodynamic force includes lift. We do not need computational fluid dynamics. We need a model that predicts canopy behavior reasonably well.
1.4 Relative wind
Aerodynamically, the wing responds to the air moving relative to it. If the canopy moves through the air in one direction, the relative wind comes from approximately the opposite direction. The canopy does not directly care how quickly the countryside appears to move beneath you. Relative wind is one of the most important reference directions in aerodynamics.
1.5 Airspeed and groundspeed
Airspeed is movement relative to the surrounding air. Groundspeed is movement relative to the ground. They are not the same. Flying into a headwind reduces groundspeed; flying with the wind increases it; flying across the wind shifts the track over the ground. But in a steady moving air mass, the wing may still have approximately the same aerodynamic airspeed in all three cases.
FIGURE 03Illustration planned
Airspeed Vs GroundspeedThree side-by-side plan views of identical canopy airspeed vectors into, across, and with a constant wind vector; label resulting ground tracks.
1.6 Glide
A canopy trades altitude for horizontal distance. This ability is called glide. For now, you do not need to compute glide ratios. The important point is that your canopy has a descending flight path through air, while the wind affects the useful distance it covers over ground. Best glide through air and best range over ground are not always the same problem.
1.7 Angle of attack
In simplified aerodynamic language, angle of attack is the angle between a reference line from the wing’s front to its back (often called the chord line) and the relative airflow. It does not simply mean how steeply the canopy points toward the ground, and it is not the same as pitch angle relative to the horizon. Pitch attitude describes the wing’s orientation; angle of attack compares wing orientation with its relative airflow. The flight path and the wing can change orientation at different rates. A flexible ram-air canopy changes shape during control inputs, so its actual geometry is more complex than a diagram of a rigid airplane wing.
FIGURE 04Illustration planned
Angle Of AttackSide-view diagram showing a canopy chord reference and the relative airflow, labeling the angle between them. Contrast it with pitch attitude relative to the horizon without implying a rigid wing.
1.8 The wing is flexible
Its inflated shape depends on airflow, internal pressure, suspension lines, line trim, fabric construction and suspended load. A normally pressurized wing, a partially collapsed wing and a deeply stalled wing are physically different aerodynamic systems. You are flying a flexible wing whose shape is part of the aerodynamic problem.
PART I / CHAPTER 02Part I · Foundations
2. The Canopy and Pilot as a Coupled System
2.1 You are not bolted to the wing
An airplane pilot normally sits inside a relatively rigid structure. Under a parachute, the pilot hangs below the wing through lines. The canopy and pilot can therefore move relative to one another. If the canopy changes flight path, your body does not instantly move into the new equilibrium position below it. You have mass and motion, and inertia means your body resists a sudden change in that motion. You continue moving. This helps explain a remarkable amount of canopy behavior.
2.2 The pendulum model
Imagine a weight hanging from a string. Move the upper attachment point sideways and the weight does not immediately follow; it swings. A canopy-pilot system behaves somewhat like this.
2.3 A flight cycle you already know: releasing deep brakes
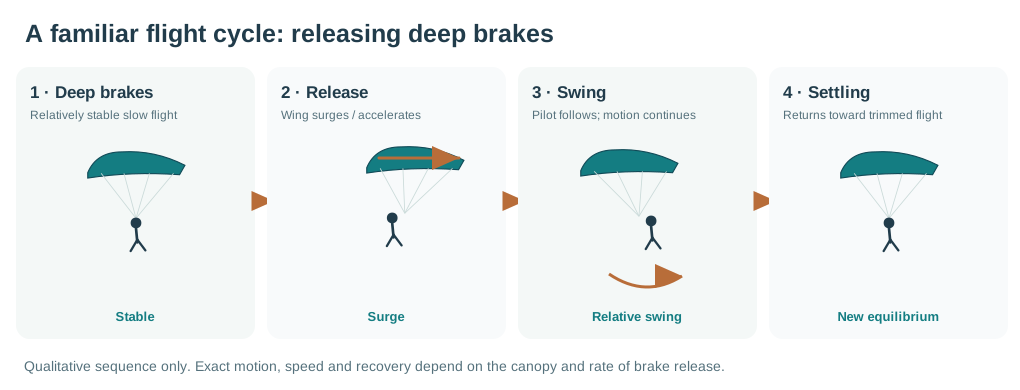
Imagine you are high above the ground in a stable, deeply braked flight state. You release both brakes. You have probably felt some version of the response during training: the canopy changes pitch and surges forward (moves ahead relative to your hanging position), accelerates toward its normal hands-up flight condition, and your body does not instantly follow. For a while, the wing is ahead of the pilot's previous position. Then your body follows, and the system moves back toward stabilized flight.
That complete sequence—not just the moment you raised the toggles—is a flight cycle. The same principle helps explain what happens after turning, flaring or releasing other control inputs.
FIGURE 05Editable vector diagram
Releasing Deep Brakes: A First Flight CycleFour simplified phases: stable brakes, control release and surge, relative swing of wing and pilot, and settling toward full flight. Timing and size vary between canopies.
There is an important difference between slowly and rapidly releasing the brakes. A gradual release may produce a smaller pitch disturbance; a sudden release may cause a much more noticeable surge and recovery. The final toggle position can be identical even though the journey there is not. This is an illustration of dynamics, not a suggestion to snap your toggles upward near the ground.
2.4 From the example to the general flight cycle
We can now give the idea a reusable shape:
Input or release → aerodynamic response → relative motion of wing and pilot → recovery → new stabilized flight state.
The size and timing depend on the wing, its starting airspeed, how much input changes, and how rapidly it changes. Not every small input produces a dramatic oscillation. The point is that neutral controls do not automatically mean a stabilized aircraft.
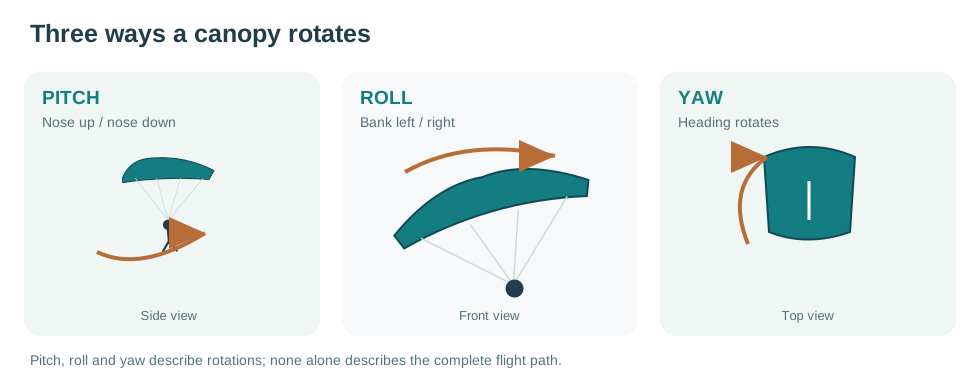
2.5 Pitch
Pitch is rotation about the wing's side-to-side axis: nose-up or nose-down movement. During brake release, the canopy's pitch and flight path change while your body retains momentum. The surge in Figure 5 is therefore a familiar example of pitch-related flight-cycle behavior. Pitch attitude is not identical to angle of attack; we will revisit that difference when discussing stalls.
FIGURE 06Editable vector diagram
Pitch, Roll And YawThree views labeling rotation about the side-to-side, front-to-back and vertical axes. These rotations are not the same as the aircraft's direction of travel.
2.6 Roll
Roll is rotation about the wing's roughly front-to-back axis: banking left or right. During a turn, the suspended pilot also moves relative to the changing flight path. A turn can combine roll, yaw, pitch, changing speed and a recovery afterward—not merely a compass-heading change.
2.7 Yaw
Yaw is rotation about an approximately vertical axis. Heading changes often involve yaw, but a canopy's nose direction and its direction of movement through the air are not guaranteed to match perfectly. This matters for coordinated turns. The car-drifting analogy in Chapter 10 will make the distinction more concrete.
2.8 Energy and inertia
Altitude gives the system gravitational potential energy; motion gives it kinetic energy. In a dive, some altitude becomes additional speed. During a flare, aerodynamic forces redirect and slow the motion. In every case, the suspended pilot has inertia, and the canopy's forces and motion change over time. We need no equations yet, but we must remember the starting state and the recovery, not just the control position.
2.9 Controls are not buttons
The beginner model is “left toggle = left.” The richer model is that a left toggle changes wing shape, forces and flight path; the system rolls and pitches; the pilot swings relative to the wing; speed and descent can change; and recovery follows. You should not need to consciously recite this every time. Good understanding gradually becomes intuition.
2.10 Why it matters near the ground
High up, the aircraft may have room to finish a maneuver and recover. Low down, the same physics applies but fewer options remain. This underpins our later discussions of low turns, flat turns, landing corrections and flare. Altitude is decision-making currency.
PART I / CHAPTER 03Part I · Foundations
3. Wing Loading — What Changes, and What Doesn't
You already know that a canopy is a wing and that your body hangs beneath it. Now imagine two pilots using the same model and size of canopy. One pilot is noticeably heavier, including their equipment. Will the two wings fly in exactly the same way?
No. Although the fabric and line geometry are similar, they are carrying different loads. That changes the flight speeds and the pilot's margins. The idea that connects them is wing loading.
Before studying the controls, it helps to see why the same toggle movement or landing technique can feel different under different circumstances.
3.1 What wing loading actually means
Wing loading compares the total suspended weight with the area of the canopy. The weight includes the jumper, jumpsuit, helmet, other worn equipment and the complete rig—not merely what the jumper weighs without equipment.
In skydiving, wing loading is usually stated in pounds of total exit weight per square foot of nominal canopy area (lb/ft²). Divide your equipped exit weight in pounds by the canopy's stated area in square feet. For example, 180 lb under a 180 ft² canopy gives a wing loading of 1.00 lb/ft², usually spoken as one to one. Verify how the manufacturer measures and labels canopy area before comparing models.
Consider two jumpers flying the same 180 ft² canopy (approximately 16.7 m²):
Total exit weight
Canopy area
Wing loading
180 lb (≈82 kg)
180 ft² (≈16.7 m²)
1.00 lb/ft²
210 lb (≈95 kg)
180 ft² (≈16.7 m²)
1.17 lb/ft²
The second jumper loads the same wing more heavily. These are arithmetic examples, not recommended canopy selections. Although metric mass and area can also be used for comparisons (kg/m²), their numerical ratios are different; never mix the units. The area printed on a canopy's label alone cannot establish that it suits a particular pilot.
3.2 More loading generally means more airspeed
The wing must produce enough aerodynamic force to support its suspended load while following its descending flight path. If you increase the load on an otherwise similar canopy, it generally needs to fly faster through the air to generate the required forces at a comparable aerodynamic state.
More loading on the same wing generally means greater airspeed and a greater descent rate. It also means more kinetic energy and a faster-moving system to manage during turns and landing.
A useful approximation from aerodynamic scaling is that speed rises roughly with the square root of loading—not in direct proportion. You do not need the equation. The practical point is that a 20% loading increase should not be interpreted as exactly 20% more airspeed, and actual performance will vary with the canopy and flight state.
3.3 Faster does not automatically mean a steeper glide
Here's a distinction that matters when you begin thinking about navigation.
Airspeed, descent rate and glide ratio are three different things. A more heavily loaded version of the same wing generally moves faster along its flight path. It may travel forward faster and descend faster, without its steady glide angle changing by the same amount—or necessarily becoming dramatically steeper.
Real canopies are flexible, so loading and airspeed can also change their shape and aerodynamic efficiency. We should not promise an identical glide ratio. But the rule “heavier equals steeper glide” is too simple.
Wind adds another difference. Greater airspeed can help a canopy make progress over the ground into a headwind, but that does not make the higher loading automatically safer or more suitable. It also means greater speed and energy when landing, and less time to manage some situations.
Later, in the glide chapter, we will compare best glide through the air with useful range over the ground. Wing loading is one reason two pilots can see very different ground tracks in the same wind.
3.4 Stall margin and slow flight
You met the word stall earlier: a breakdown of normal aerodynamic lift. We will explain it properly in Chapter 14.
For now, remember that a more heavily loaded wing generally has a higher airspeed at which it can stall, all else being comparable. A stall is still fundamentally an aerodynamic limit involving airflow and effective angle of attack, not a particular number on an airspeed indicator.
This matters when comparing deep brakes, flat turns and flares. The slower-looking canopy is not necessarily the one with the greatest control margin. Nor does a faster canopy become immune to stalls.
3.5 Turning, the flight cycle and recovery
Think back to the brake-release flight cycle from Chapter 2. The canopy accelerates, and the pilot moves relative to it before the system settles.
Now imagine that the same wing carries a greater suspended load. Its ordinary flight speeds and the energy involved in a turn or dive will generally be higher. That can make inappropriate inputs more consequential, especially when altitude is limited.
But don't jump to a new half-truth: higher wing loading does not automatically produce a specific recovery arc or an exactly predictable turn rate. Wing design, line geometry, controls and starting flight state all matter. The right question is how this canopy at this loading actually flies and recovers.
The control chapters that follow will make more sense if you retain this distinction between how fast the system is moving and how it responds to a particular input.
3.6 Landing: speed, energy and the time to respond
A higher-loaded canopy generally approaches with greater airspeed and descends faster in comparable flight states. The pilot may have less time to recognize and correct an imperfect approach, and touchdown mistakes can involve greater energy.
A higher airspeed can provide aerodynamic energy for a flare, but this should never be confused with an easier landing. The pilot still has to choose the right moment, use the appropriate control technique and complete the maneuver before reaching the ground.
A wing that feels comfortable during calm, familiar conditions may be much more demanding in an unfamiliar landing area or when the approach does not go to plan. Suitability includes those imperfect days, not just your best landings.
3.7 Loading is not the whole canopy
Now change the comparison. Two pilots have the same numerical wing loading, but one uses a physically smaller canopy. Or they fly different canopy models at the same area.
Their aircraft may still behave quite differently. A smaller wing usually has shorter lines and different dynamic response; different designs can have different trim, planform, opening characteristics and recovery behavior.
Therefore, do not use wing loading as a single-number certificate of safety or readiness. And do not assume that one pilot's experience at a particular loading transfers to another pilot on a different wing.
We will use this distinction again in Part III, where the task is choosing equipment and deciding whether to change it. For now, it helps you avoid a misleading shortcut while learning the controls.
Where we go next
We now know that the wing's aerodynamic behavior depends not only on its design and controls, but also on the load it carries. Next we'll map the four main control families. Then we can examine how their effects combine with speed, inertia and recovery.
PART I / CHAPTER 04Part I · Control methods
4. The Control Map
Now we add the pilot as an active controller. Toggles, rear risers, front risers, and harness can all change the flight path, but they do not do so through identical mechanisms.
4.1 Different ways to reach the same heading
Imagine wanting to change heading by 30°. A toggle, a rear riser, harness input, or a combination may achieve it. But each can have a different cost in roll, pitch, yaw, drag, speed, descent, swing and recovery. The correct question is not just “How do I make it turn?” but “Which input changes what I need while creating the least unacceptable consequence?”
4.2 The four families at low resolution
Control
What primarily changes
Broad effect
Toggles
Trailing-edge geometry
Brake, steer, flare, and eventually stall
Rear risers
Rear suspension geometry
Alternative steering, glide change, short stall margin
Front risers
Front suspension geometry
Steeper flight, possible acceleration and increased descent
Harness
Distribution and geometry of pilot loading
Roll influence and heading change
This is deliberately simplified; every control affects more than one variable.
4.3 Look beyond heading
Learn to observe heading (where the nose points), flight path (where the system moves), pitch (diving or recovering), roll (bank), airspeed, descent rate, pilot movement and recovery. A successful turn is not adequately described by its final heading alone.
4.4 Amount, speed and starting state
A small toggle input and a deep toggle input can produce qualitatively different outcomes. The rate of input or release also affects flight-cycle amplitude. And the same control movement can behave differently from full flight, deep brakes or a dive. Whenever you study a control, ask: Which one? How much? How quickly? Starting from what flight state? At what altitude?
4.5 Controls interact
Real flight often combines harness and toggles, harness and rear risers, symmetrical braking and asymmetric steering, or control changes during recovery. Learn the mechanisms separately so the combinations make sense later.
4.6 Authority and margin
Control authority means how much a control can change the wing. Control margin is the space between the input you are using and the point where the wing begins behaving undesirably, such as approaching a stall. Rear risers may have strong authority and a short margin before stall. Effective does not mean forgiving.
4.7 Canopy differences
Response varies with design, size, planform, trim, wing loading, harness geometry and the pilot. Larger student canopies can have very heavy front risers and subtle harness response. A more responsive canopy is not necessarily safer. Do not downsize to make a training control feel easier.
FIGURE 07Illustration planned
Control MapOne central canopy-pilot drawing with four labeled input zones and a small outcome panel for each. Clarify which line groups attach to which risers for the illustrated configuration.
PART I / CHAPTER 05Part I · Control methods
5. Toggles
Toggles are usually the first canopy control a skydiver learns, and therefore easy to underestimate. They are not merely steering handles. They can turn, slow, change descent, alter glide, pitch the wing, flare and stall it.
5.1 What a toggle moves
A toggle pulls a steering line that deflects part of the trailing edge. Symmetrical input affects both sides; asymmetrical input creates different aerodynamic forces across the span and makes the wing turn. You are changing the shape of a flying wing, not pressing a left/right button.
FIGURE 08Illustration planned
Toggle Input And Trailing-Edge DeflectionPlanned illustration or photo sequence showing a canopy in full flight, symmetrical toggle input, and asymmetrical toggle input. Emphasize the brake lines and the trailing-edge deformation they create.
5.2 Symmetrical input and brake range
From full flight, progressively applying both toggles generally slows the canopy and changes its flight path. Depending on the wing and brake amount, descent can decrease, then increase again in deep brakes, and excessive input may lead to stall. The spectrum runs from full flight through light, moderate and deep brakes toward the stall region. These are aerodynamic states, not universal body landmarks.
5.3 There is no universal half brakes
Hands at the chest, waist or hips do not guarantee the same aerodynamic state on every canopy. Steering-line length, canopy design, line trim, harness fit and arm reach all matter. Learn what your canopy actually does throughout its usable range.
5.4 Asymmetric toggle input
Pulling one toggle farther creates unequal trailing-edge deflection and a turn. Depending on the amount and rate, the wing may also roll, dive, accelerate, lose altitude and move the pilot outward. A gentle correction and an aggressive toggle turn are not the same maneuver at different scales.
5.5 Why turns can dive
A canopy does not simply rotate flat about a vertical axis. During a significant toggle turn, the curved flight path, aerodynamic asymmetry and suspended pilot interact. The system can roll, pitch and accelerate into a steeper descent. The cost of a heading change depends on how you make it.
5.6 Release is part of the maneuver
After a large turn, raising a toggle ends the commanded input but may not immediately end the roll or dive. The complete maneuver includes the entry, turn and recovery. Watch what happens after releasing the control, not only while pulling it.
5.7 Full-flight position versus stabilized flight
Hands all the way up means the toggles are released. The wing may still be accelerating or recovering. Full-flight control position is not necessarily stabilized full flight.
5.8 Brakes can change arrival time
Controlled braked flight may change descent rate and how long you remain aloft, which becomes relevant to vertical separation. But “more brakes means more time” is not a universal rule. Very deep brakes can increase sink and reduce useful control margin.
5.9 Slow flight
Flying with significant brake input while the wing remains controllable is an important regime for flat turns, traffic management, stall awareness and landing. The goal is not simply to pull as deeply as possible; it is to recognize the wing's slow-flight behavior and the approach to its limits.
5.10 Rate of brake release
Release after deep brakes is itself an input. A rapid release can create a stronger pitch surge than a gradual release. Comparing these effects at generous training altitude helps explain why reflexively snapping hands up close to the ground can be problematic.
5.11 Turns from different brake settings
Turning from full flight and turning while in stable partial brakes can create different dive and altitude characteristics. A braked turn is the foundation of a flat turn, which we will study later. The same toggle movement does not create the same response from every starting state.
5.12 Toggles and flare
Landing uses the same trailing-edge controls, but with carefully chosen timing, rate, extent and starting state. A flare is not a magical special mode; it is a deliberate application of the aerodynamic principles already learned.
5.13 The limit: stall
A control's usable range is defined by what the wing is doing, not how far your arms extend. Beyond a certain combination of effective angle of attack, loading and flight state, the canopy may stall. We will examine this later.
PART I / CHAPTER 06Part I · Control methods
6. Rear Risers
You already know that pulling a toggle changes the trailing edge of the canopy. But what if you want to change flight path without pulling the brake lines? Rear risers are not merely an emergency backup if a steering line cannot be used; they are another way to change the wing’s shape and flight path. You can achieve similar results through different aerodynamic mechanisms.
6.1 What a rear riser actually moves
Suspension lines on a typical ram-air canopy are arranged into groups, commonly called A, B, C and D, although arrangements vary. On a four-line-group wing, the front risers commonly carry A and B, and the rear risers carry C and D. Steering lines are separate from these suspension groups. Pulling a rear riser changes the position of the rear suspension attachments relative to the front of the wing. Unlike a toggle, which directly deflects part of the trailing edge through a brake line, this affects a larger region of the wing through the suspension system. The resulting flight response is different.
FIGURE 09Illustration planned
Rear-Riser Input And Canopy DeformationPlanned illustration or photo sequence comparing neutral flight with symmetrical and asymmetrical rear-riser input. Show the rear line groups moving down and the broader rear portion of the wing changing shape.
6.2 Symmetrical rear-riser input
A small equal input changes rear suspension geometry, and thereby wing attitude and aerodynamic forces. On some canopies a modest rear-riser input can flatten or improve the glide in a particular flight situation. But more input does not necessarily mean better glide. Continued input may eventually approach a stall, with relatively little usable range on many canopies. The important pattern is: small input → useful change → diminishing benefit → possible instability. The exact boundaries are canopy-dependent.
6.3 Asymmetrical rear-riser input
Pull one rear riser more than the other and you create an aerodynamic asymmetry. The canopy begins changing heading. On some canopies, a small rear-riser turn can be flatter than a comparable toggle turn, with less pitch disturbance. But a rear-riser turn is not guaranteed to be flat, gentle or altitude-preserving. Design, loading, speed and input all matter.
6.4 Why the turn may be flatter
Toggles deform the trailing edge; rear risers change the geometry of the rear suspension. That different distribution of deformation may make some gentle heading changes less disruptive. Do not infer that rear-riser turns “do not lose altitude.” A heading change has an aerodynamic price, and control method helps determine that price.
6.5 Immediately after opening
Rear risers can provide steering while the toggles are still stowed. After a normal, controllable opening, that can be important if traffic requires an immediate heading change before unstowing the brakes. First recognize whether the canopy is controllable and keep following your trained malfunction and decision-altitude procedures (the pre-established height by which you must make certain malfunction decisions); rear-riser steering does not replace them.
6.6 Control pressure and margin
Rear risers often feel heavier because the pilot is changing suspension geometry while the lines carry substantial wing loading. Pressure varies with canopy and flight state. The control range before stall can be quite short, and excessive input may cause an abrupt loss of normal flight. Effective and unforgiving are not opposites. A control can do a lot with relatively little movement and still demand respect.
6.7 Rear-riser stalls
A rear-riser stall differs in mechanism and control travel from a conventional toggle stall. The transition from useful response to loss of lift can be abrupt. Recognize that a control that feels smooth during small corrections may become hazardous with a deeper input. Deliberate rear-riser stall exploration is a separately planned, coached exercise at generous altitude for suitable students and canopies, not a casual experiment.
6.8 Rear risers after unstowing brakes
Rear risers remain useful after the brake toggles are released. On suitable equipment, coached practice can compare rear-riser steering with toggle steering while keeping normal control immediately available. Learn how to handle toggles and risers without allowing inadvertent steering-line inputs or losing access to the toggles.
6.9 Rear risers and glide
Small symmetrical input can change glide performance and, under some conditions, extend useful travel. But best glide through air and best range over ground are different problems when wind is present. Do not sacrifice a safe alternate landing area while trying an unfamiliar technique to reach the preferred one. The better skill is judging range conservatively.
6.10 Rear risers and landing
Rear risers can produce steering and flare-like effects, and experienced pilots may use them during parts of an approach. But that does not mean a 25–50 jump pilot should routinely land on them. The short control margin on many wings makes significant low-altitude rear-riser input unforgiving. Normal landings should follow the taught technique appropriate to the specific canopy. We will discuss carefully selected small final corrections later, after learning recovery and flare principles.
Key idea. Knowing a control can produce a maneuver is different from being ready to use that maneuver near the ground.
PART I / CHAPTER 07Part I · Control methods
7. Front Risers
We have changed the trailing edge with toggles and rear suspension geometry with rear risers. What happens when we change the front suspension? This creates a different response—and shows how altitude can become airspeed. We will explain front-riser flight without teaching swooping or high-performance approaches.
7.1 What a front riser moves
Front risers connect to the forward suspension-line groups. Pulling them changes the geometry of the front of the wing relative to the rest of the system. A symmetrical input generally causes a steeper flight path and increased descent; as the dive develops, airspeed may increase significantly. This is different from ordinary full flight.
FIGURE 10Illustration planned
Front-Riser Input And Diving FlightPlanned illustration or photo sequence comparing neutral flight with symmetrical front-riser input. Show the forward line groups moving down, the wing entering a steeper path, and the difference from ordinary hands-up trim.
7.2 Symmetrical front-riser input
A steeper path allows gravity to accelerate the system along that path while aerodynamic forces still act. The general sequence is steeper flight → greater descent → acceleration → greater airspeed during the developing dive. Potential energy is being traded for kinetic energy. The wing is not creating energy for free.
7.3 Not the same as releasing brakes
Pulling a front riser actively changes the wing away from its ordinary hands-up flight configuration; releasing brakes removes a trailing-edge input and lets the wing return toward that configuration. Full flight is not the same as diving flight.
7.4 Asymmetric front-riser input
Pulling only one front riser creates asymmetry and may produce a rolling, diving turn. Depending on input and wing, heading change, bank, descent and airspeed can be substantial. It is not simply “another steering handle.” It can alter the system's energy and altitude requirements dramatically.
7.5 Recovery after release
Releasing the front riser does not instantly restore ordinary flight. The wing may still be fast and steeply descending, and the canopy and pilot must move toward a new equilibrium. Recovery can consume significant altitude. This leads to the recovery arc: the full maneuver includes what happens after the diving input ends.
7.6 Why fronts may be difficult to pull
Front-riser pressure on larger, lightly loaded student canopies can be high, and may become harder to sustain as speed develops. Results vary by wing, trim, loading, equipment, riser handles and pilot strength. Physical inability to produce a front-riser maneuver is not a reason to downsize and not a failure of canopy education. The theory remains useful even if the coach judges the practical exercise unsuitable.
7.7 Steering-line trim matters
If steering lines are too short, front-riser input may inadvertently tension the trailing edge as the front suspension changes. That can produce conflicting effects or abnormal response. Do not adjust brake lines to make riser maneuvers easier; unusual trim or control response belongs with a qualified instructor/rigger and the manufacturer's specifications.
7.8 What fronts are used for
Front risers affect flight path, speed, descent and certain turns. They also have a role in some advanced high-performance landing techniques, commonly called swooping. It is helpful to understand that these techniques exist, but this program does not teach swoop approaches, diving-turn initiation heights, performance landing setups or progressively lower turns. High-performance landings require a separate, qualified progression and involve substantially increased risk.
7.9 Why discuss something we won't teach near the ground?
Because mystery can fuel unsafe curiosity. A jumper who knows nothing about front risers might assume they are just alternate steering controls and try them without understanding the altitude and recovery costs. Knowing what they do helps the pilot make better decisions and recognize hazards without learning the advanced landing maneuver itself.
PART I / CHAPTER 08Part I · Control methods
8. Harness Input
So far, we have examined controls that influence the wing through toggles or risers. But your body itself can change how the canopy is loaded. And you may already have been doing this unintentionally.
8.1 Your body is part of the control system
Your suspended weight is transferred through the harness, risers and lines to the wing. Shifting body position can change loading and suspension geometry, producing a turning tendency. This is harness input or weight-shift steering. Your hands are not your only controls.
FIGURE 11Illustration planned
Harness Input And Loading ShiftPlanned illustration or photo sequence comparing neutral body position with left and right harness input. Emphasize changed loading through the harness and leg straps, and the resulting roll / heading tendency rather than brake-line movement.
8.2 A harness turn
A deliberate weight shift can influence the canopy's roll and heading. The amount and quality of response depend on canopy, wing loading, harness fit and pilot position. Unlike a toggle turn, it does not directly pull the trailing edge. On some wings, small harness corrections create a relatively smooth turn with less pitch disturbance than substantial toggle input. Less disturbance does not mean zero disturbance.
8.3 It is not simply leaning your shoulders
A pilot can throw their shoulders sideways without transferring much useful load through the leg straps. Hips, pelvis and leg-strap loading matter, and precise movements can be more effective than exaggerated upper-body leaning. Learn how your own harness responds, rather than treating one visible posture as universal.
8.4 Canopy and fit differences
A large, lightly loaded rectangular wing may react only slightly; a smaller or differently designed wing may respond clearly. Harness fit, articulation and geometry can also affect how loading changes. The objective is not to force all wings to behave identically; it is to learn the characteristics of the wing you fly.
8.5 Harness and wing loading
Higher loading often changes harness responsiveness, but it also affects speed, energy and margin for error. More responsive is not automatically safer. Do not downsize for more harness authority.
8.6 Harness input and flight cycle
Harness steering changes loading differently from trailing-edge steering. A modest harness input may affect heading with a relatively small pitch disturbance, depending on the wing. But aggressive harness turns on responsive canopies can still bank, dive and accelerate. Judge an input by the flight path and recovery it produces—not by how gentle the physical motion feels.
8.7 Combined controls
Harness input can support toggles or rear-riser steering. Starting roll with a weight shift before adding directional control may improve coordination on some wings. This is the bridge to Brian Germain's coordinated-turn teaching, discussed later.
8.8 Harness during landing
Moving one hip, reaching one leg forward or twisting the torso while flaring can change harness loading. With some canopies this adds unwanted turn/roll close to the ground. Keep deliberate, balanced body position and trained flare/PLF posture rather than creating involuntary asymmetry.
8.9 Equipment configuration
Chest-strap position, harness fit and articulation can change how a jumper sits and moves. Follow manufacturer instructions and appropriate local training; don't casually modify equipment to chase additional turning authority.
PART I / CHAPTER 09Part I · Control methods
9. Putting the Control Map Together
You now know four ways to influence the same aircraft. Which would you choose for a small heading change? The answer should depend on what happens after the wing changes direction—not on which control feels most impressive.
9.1 The same problem at two altitudes
High above the landing area, with clear airspace: You want a gentle heading correction. You have time to compare the way a toggle, a rear riser and a harness input respond—with a coach and an appropriate wing.
Near the ground: The heading error is just as small, but a dive or abrupt pitch change has much greater consequences. Sometimes the best correction is no correction, provided you still have a clear, controllable landing path.
There is no universal ranking of the controls. The useful question is: Which response—including recovery—does this situation allow?
9.2 What we gained by separating the controls
Think back to the flight cycle after brake release. The hand movement might be over, yet the wing and suspended pilot are still changing their relative positions. The same warning applies to a turn: two controls may achieve the same heading change but produce different amounts of roll, pitch and subsequent recovery.
Here is the connection to our control map. A toggle changes the trailing edge, while harness input changes how the pilot loads the suspension system. Using them together is not simply adding two turning strengths. It can change how the wing enters the turn—the next chapter's central idea. And the braked turn we study afterward starts from a different flight state entirely.
Knowing each control independently is therefore the foundation for making sensible combinations, not an instruction to use several controls at once on every approach.
PART I / CHAPTER 10Part I · Turning and limits
10. Turns — Changing Heading Is Not the Whole Story
We have studied controls separately. But what actually makes a good turn? Imagine two pilots starting north and finishing east after a 90° heading change. One flies a smooth arc, keeps the wing controlled and recovers gently. The other dives, swings outward, loses far more altitude, and continues recovering after the final heading is reached. The endpoint is the same. The maneuver is not. Where you finish pointing tells little about how well you turned.
10.1 Heading, flight path and attitude
Heading is where the canopy's nose points. Flight path is where the canopy is moving. Attitude is its orientation, including pitch, roll and yaw. They are related but not interchangeable. A wing may point in one direction while sliding sideways relative to the airflow; it may still be diving after heading change ends. To understand turning, look at all three.
10.2 Why a canopy turns
A turning wing follows a curved flight path because aerodynamic forces change. An asymmetric toggle deflects one side of the trailing edge. A rear riser changes suspension geometry. Harness shifts loading. These can create different combinations of roll, yaw, pitch and drag, all influencing the shape of the turn.
10.3 Turning is not just rotating: think of a drifting car
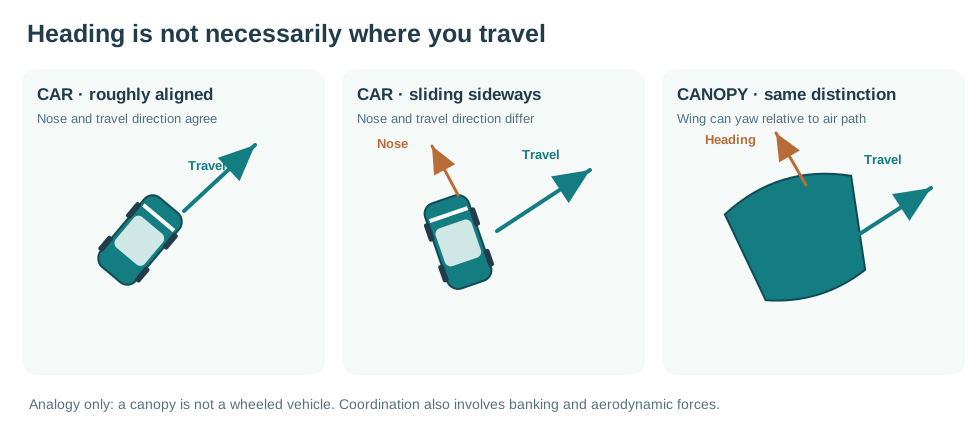
Picture two cars negotiating the same bend. The first follows the corner with its nose approximately aligned with its direction of motion. The second is drifting: its nose points somewhat differently from the direction in which it is actually sliding. Where it points is not necessarily where it travels.
A canopy can also rotate in yaw while its air-relative motion still includes a sideways component. Its orientation and its flight path are not the same measurement. That difference helps explain why a smooth heading change need not be an aerodynamically well-coordinated turn.
FIGURE 12Editable vector diagram
Car Drift And Turn CoordinationTwo cars with aligned versus misaligned nose and motion directions, contrasted with a canopy whose heading differs from its actual air-relative path. Analogy only, not a depiction of identical mechanics.
10.4 What is a coordinated turn?
In general aviation, a coordinated turn keeps roll, yaw and the actual flight path working together, minimizing undesirable sideways motion. A ram-air canopy can be described with a similar mental model even though it lacks a rigid airplane's controls or instrumentation. In The Parachute and Its Pilot, Brian Germain emphasizes coordinated steering through harness-supported turn entry.
10.5 Roll and yaw together
A toggle-only turn introduces asymmetric trailing-edge forces and can develop roll and yaw in a particular sequence. A harness-supported turn can begin with an appropriate roll tendency and add directional steering. On some canopies the result feels smoother or reduces unnecessary sideways flight. The precise balance is canopy-specific.
10.6 Look → Lean → Turn
Germain's teaching cue is LOOK → LEAN → TURN. Look and clear the intended path; introduce an appropriate harness loading change; add the steering input needed to shape the turn. Neither a dramatic lean nor a hard toggle pull is the objective. The goal is a smooth, predictable flight path. The sequence is a conceptual aid, not a fixed timing recipe for every wing.
10.7 Can you see whether the turn is coordinated?
On many sport-canopy systems, the main pilot chute and its bridle remain attached behind the inflated wing after deployment. Brian Germain describes using the trailing bridle as a rough yaw or sideslip indicator, much like the small piece of yarn sometimes used on a glider.
In relatively clean, coordinated flight, the bridle tends to stream aft roughly parallel to the canopy's front-to-back ribs—that is, approximately along its chord direction. During an uncoordinated turn it may drift to one side, indicating that the airflow is meeting the wing at a sideways angle rather than passing mainly from nose to tail.
This is an observation, not a calibrated instrument. A collapsed pilot chute may be difficult to see, and the bridle can move because of turbulence, the canopy's wake, oscillations or the deployment system itself. A bridle that looks aligned does not prove that every aspect of the turn is coordinated. Nor should you look up at it when you need to watch traffic, maintain altitude awareness or fly a landing pattern.
If your equipment permits a clear view, ask a qualified coach whether observing the bridle during a gentle, planned high-altitude comparison would be useful. Airspace awareness comes first.
10.8 What does it feel like?
You may perceive a smoother roll entry, different steering pressure, different pilot swing, less apparent sideways motion or gentler recovery. But smooth feeling alone is not proof of a safe turn: even a smoothly coordinated steep turn can consume significant altitude.
10.9 Why not always use harness?
Harness authority differs widely. On a large lightly loaded canopy the response can be small; on a responsive wing it may be substantial. Some changes demand other controls. Some situations call for a relatively flat rather than an ordinary banked turn. Choose and combine controls; don't mechanically replace toggles with harness input.
10.10 Coordinated does not mean flat
A coordinated turn can still bank steeply, dive, accelerate and require a long recovery. Coordination describes the quality of movement through the turn, not a promise of low altitude loss. You must still consider energy and proximity to the ground.
10.11 Energy and efficiency
Good coordination may avoid unnecessary aerodynamic drag and inefficient motion. But preserving kinetic energy and preserving altitude are different objectives. A smooth, fast turning canopy can still be inappropriate low to the ground.
10.12 The exit matters
A complete turn has entry → established turn → recovery. The wing may still be banked or diving after the pilot stops asking for heading change. Ending the turn requires thinking beyond returning the toggle to its released position. Watch for recovery of the entire flight state.
10.13 Ordinary applications
These ideas can help make small heading changes, navigate toward holding areas, understand riser-harness combinations and avoid unnecessarily disruptive steering. But a landing pattern is not the place to introduce unfamiliar complex maneuvers. A good pilot favors appropriate and predictable control, not impressive control.
PART I / CHAPTER 11Part I · Turning and limits
11. Flat Turns — Changing Direction Without a Large Dive
Now imagine needing to change heading while minimizing a large dive. Perhaps altitude is limited or you are creating space in canopy traffic. A flat turn deliberately emphasizes preserving a relatively level wing and limiting excess descent while changing direction. It is not a license to rescue a poor landing plan with a low turn.
11.1 Why ordinary turns can cost altitude
A significant toggle turn from full flight may roll the wing, pitch into a dive, accelerate, swing the pilot outward and require altitude to recover. That cost includes the recovery, not only the period during which the toggle is pulled. A flat turn seeks to reduce those undesirable consequences.
11.2 What makes a turn flat?
The term is practical, not absolute. A flat turn changes heading while attempting to minimize dive, large bank and unnecessary altitude loss. The wing is not perfectly level and altitude loss is not zero. A slow-looking turn is not automatically safe: the canopy may be near stall if held too deep in brakes.
11.3 Begin with slow flight
A controlled braked turn starts from stable partial brakes and creates a modest asymmetry. The wing can then change heading while remaining relatively slow rather than entering the larger dive of a forceful full-flight toggle turn. The mental sequence is symmetrical brakes → stable slow flight → deliberate differential input → heading change. This is an application of aerodynamics, not a memorized trick.
11.4 Different ways to create asymmetry
From a suitable braked condition, a turn may be initiated by slightly releasing one side, slightly increasing brake on one side, or a supervised combination. Releasing the left side relative to a still-braked right tends to turn the wing toward the more-braked right side; pulling the right deeper also tends to turn it right, but decreases that side's stall margin. The actual technique and allowed control range must be learned on the specific canopy with an instructor. This explanation is not a stand-alone instruction for low-altitude execution.
11.5 Stall margin matters
Because the wing is already in brakes, less usable stroke may remain. Additional asymmetric input can produce a local stall; excessive symmetric input can stall the wing more generally. “Pull both handles down and then turn” is not adequate instruction. Learn the slow-flight region and the individual canopy's boundaries at altitude.
11.6 Flat does not mean gentle
A canopy near stall can react abruptly. An aggressive braked turn can produce unexpected behavior even with modest groundspeed. Low apparent speed does not imply low risk. The objective is a controlled heading change while maintaining an appropriate stall margin, not maximizing brake depth.
11.7 Recovery after a flat turn
Flat turns are also part of the flight cycle. A properly executed braked turn may avoid a large dive, but afterward the pilot must transition from the braked state appropriately. Abruptly throwing both toggles to full flight can cause a surge. The entire maneuver includes entry, turn and recovery.
11.8 Connection to flare
If the wing is already in brakes near the ground, it has reduced airspeed and less remaining toggle stroke. A pilot may need an appropriate braked-flight-to-flare transition rather than suddenly releasing the brakes and producing another pitch cycle. This depends on the exact conditions and must be coached, practiced and aligned with the canopy's manufacturer guidance. Do not improvise it near the ground.
11.9 Landing-pattern mistakes
If you realize you are off the planned route at limited altitude, a trained flat-turn technique might help with a genuine obstacle or heading problem. But the best response may instead be to abandon the exact planned route or target and land on a clear alternative line. Do not sacrifice a controllable wing for a plan that has stopped making sense.
11.10 Traffic and vertical spacing
Flat turns may support navigation while in controlled slow flight, including managing descent timing and spacing around other canopies. This only helps when the pilot understands that canopy's brake response, remains predictable, and has suitable airspace. Slow flight is not universally the best way to create vertical separation; it can increase sink on some wings at deeper settings.
11.11 Flat versus coordinated
These terms describe different objectives. Coordination concerns how yaw, roll and flight path work together; “flat” concerns minimizing dive and unwanted altitude loss. A relatively flat turn can be well coordinated. A coordinated turn can be steep. Neither description alone answers whether a particular turn is safe for the altitude.
11.12 Emergency value
The ability to turn with relatively little dive is an important defensive skill. But the skill must already be familiar, not discovered during a low-altitude surprise. Learning flat turns does not make it acceptable to plan or make unnecessary low turns.
PART I / CHAPTER 12Part I · Turning and limits
12. Putting Turning Skills Together
Imagine three identical arrows drawn on a map: each shows a 90° turn. One belongs to a canopy high in clear airspace, one to a canopy among traffic, and one to a canopy very close to the ground. The drawing is identical; the safe choices are not.
The difference becomes clearer if you connect the last two chapters. A coordinated turn aims to manage how the wing rolls and follows a curved path through the air. A flat turn places a different constraint on the same task: avoid creating a large dive while changing direction. Neither term guarantees a harmless turn. A well-coordinated turn can still be steep, and a poorly handled deeply braked turn can approach a stall.
The important extension is that a pilot does not choose between named maneuvers in isolation. First ask what you need to preserve—space, altitude, controllability, traffic separation—then consider how the whole maneuver will affect those margins.
PART I / CHAPTER 13Part I · Turning and limits
13. Slow Flight — Approaching the Limits of the Wing
What happens when we keep slowing the canopy? Light brake input often reduces airspeed and changes descent. Moderate brakes may produce a useful slow-flight condition. But deeper braking does not improve performance indefinitely, and eventually the wing may be unable to maintain normal flight. Slow flight is important in its own right and forms the foundation for understanding stalls and flare.
13.1 Slow flight is still flight
From stable full flight, pulling both toggles down a modest amount changes trailing-edge shape, forces, pitch and speed. After the system settles it can remain fully inflated, controllable and flying in a slower regime. Slow flight is an ordinary capability of the wing, not necessarily an emergency condition.
13.2 Braking does not simply mean descending more slowly
As brakes increase, the descent rate may initially decrease; further input may cause a rising descent rate and a high-sink condition. The progression is change of speed and glide → useful slow-flight region → deteriorating performance → possible stall. The response is canopy-specific. There is no universal hand location for minimum sink.
13.3 Control response and available energy
In slow flight, control pressure and response may differ, dynamic pressure is lower, flare energy may be reduced, and stall margin may be smaller. But slow flight is not harmless: large asymmetric input can still produce a dangerous response. Learn the behavior, not merely where the toggles are positioned.
13.4 Slow flight and airspace
Braked flight may alter arrival timing relative to other parachutes by changing descent rate, and it may allow flat turns while flying slowly. However, deep braking on some wings increases sink rate and may worsen spacing. The correct choice depends on the aircraft, wind, traffic and landing options. We will discuss vertical and horizontal separation in Canopy Airmanship.
13.5 Minimum descent versus best glide
The brake setting that keeps you airborne longest is not necessarily the one that carries you farthest horizontally. Likewise, best aerodynamic glide through the air is not always best range over ground with wind. Different objectives demand different flight states.
PART I / CHAPTER 14Part I · Turning and limits
14. Stalls — When the Wing Stops Flying Normally
Most jumpers first meet stalls as a question about pulling the toggles too far down. That is one way to approach a stall, but it is not the definition. A stall happens when the airflow over the wing no longer supports normal lift-producing flight, usually because the effective angle of attack has become too great and the airflow separates from parts of the wing. On a flexible ram-air canopy, the wing may also deform or lose pressure. A stall can develop in deep, slow flight—or during a rapid maneuver while the canopy still has substantial speed.
14.1 The stall is not a toggle position
The same hand position can produce different results according to start speed, line trim, rate of input, canopy design, turn loading and current flight state. A body reference such as “waist level” is not an aerodynamic measurement.
14.2 Static (quasi-static) versus dynamic stall
First picture slowly approaching the boundary. Now picture arriving at a similar aerodynamic condition very quickly. The wing may not behave identically. That is the practical reason to distinguish the way conditions change:
Static or quasi-static stall: the wing approaches its stall boundary relatively gradually, such as steadily increasing both brakes and holding a slow condition until normal lift-producing flight breaks down. “Static” does not mean stationary; it means the change is slow enough to approximate a sequence of nearly steady states.
Dynamic stall (technical aerodynamic sense): the wing experiences rapidly changing effective angle of attack and transient flow behavior; the aerodynamic response can differ from the same nominal angle approached slowly. Certain rapid pitch/control maneuvers can produce a brief overshoot or abrupt breakdown in lift before the flow reorganizes.
Terminology note. Some traditional skydiving training texts use “dynamic stall” more broadly for a transient end-of-flare loss of support. That is not necessarily the same as a fully developed technical dynamic-stall flow-separation event, and not every normal flare constitutes such an event. The terms should be defined when used so jumpers do not treat them as unrelated physics.
14.3 Static stalls: the gradual approach
Starting in full flight, deepening symmetrical brakes slows the canopy, changes descent and control response, and may eventually reach stall. Depending on wing design, an approaching stall may produce lower forward speed, changed toggle pressure, reduced responsiveness, buffeting, increased sink, changes in pressurization or unusual relative motion of wing and pilot. No single warning sequence is guaranteed.
14.4 Developed stalls vary
In a developed stall, the canopy may lose lift and internal pressure, deform, descend sharply or even show backward flight. Some larger student-oriented wings remain relatively inflated in very deep brakes and enter a high-sink condition rather than a dramatic collapsing stall. Do not assume all canopies behave alike.
14.5 A car drifting in the pitch plane
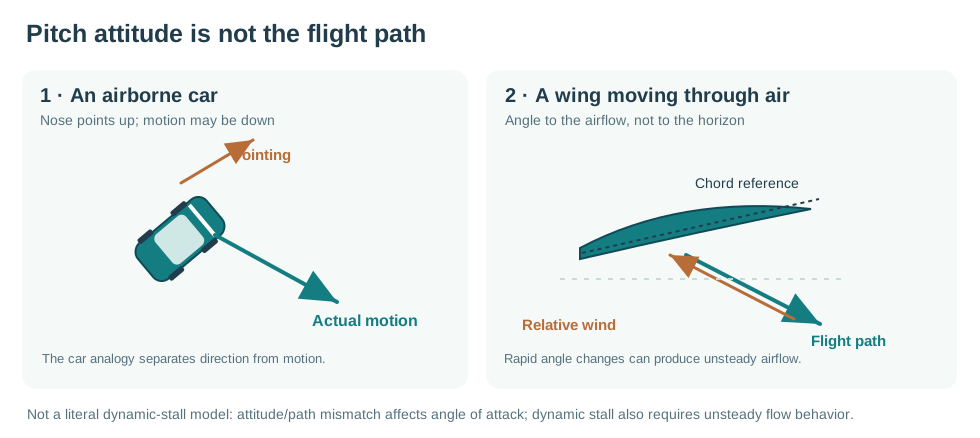
The drifting-car analogy from Chapter 10 works in another plane. Imagine a car briefly airborne over a crest. Its nose may still point upward even while the car's path has started curving downward. Its attitude and its actual direction of travel are different. Now rotate that idea into our flying wing: the canopy's pitch attitude is not the same as its flight-path angle. The relative wind depends on its motion through the air, so the difference matters for effective angle of attack.
FIGURE 13Editable vector diagram
Pitch Attitude Is Not The Flight PathA deliberately airborne-car analogy and a wing side view distinguish the object's pointing direction from its motion. Mark the wing chord and relative airflow without equating the analogy to a full dynamic stall model.
Now imagine the canopy pitching rapidly while its motion and the surrounding airflow are still responding. The wing's effective angle of attack may change quickly, and the airflow may not behave exactly as it would in a slowly established state. That is the reason rate and motion history matter to technical dynamic stall.
14.6 Flare and transient lift loss
A flare temporarily changes aerodynamic forces and flight path as the system decelerates. Near the end of an overlong or early flare, useful support may decrease and sink increase. Older skydiving material sometimes labels part of this end-of-flare transition “dynamic stall,” but do not confuse it with a fully developed static toggle stall. Nor should you assume every proper flare has a fully developed technical dynamic stall. The practical lesson is that a flare can temporarily reduce descent, not hold you aloft indefinitely.
14.7 High-speed and accelerated stalls
A wing can stall at substantial airspeed when a large or abrupt maneuver rapidly raises effective angle of attack or aerodynamic loading. An accelerated stall emphasizes increased loading and a higher airspeed requirement to avoid stall; high-speed stall describes the high airspeed at which it occurs; dynamic stall emphasizes unsteady/transient airflow. They overlap in some situations but are not exact synonyms. High-speed stalls are outside the deliberate practical exercises of this program.
14.8 Not all high descent is stall
A front-riser dive may have high airspeed and high sink without being stalled. A canopy in deep brakes may sink significantly while still somewhat inflated. Descent rate describes motion; stall describes aerodynamic loss of normal lift. They may coincide, but they are not equivalent.
14.9 Rear-riser stalls and asymmetry
Excessive rear-riser input can stall a wing over a short travel range. If one side loses lift before the other, asymmetric forces may cause rotation or an uncontrolled spin. This is why aggressive steering near the stall boundary is hazardous. Rear-riser stall practice, if suitable, is a separate coached exercise.
14.10 Recovery is part of stall training
Removing the stall-causing input does not instantly restore a stable wing. Airflow, pressurization and shape must recover, and the suspended pilot/canopy may then surge through a pronounced flight cycle. Abrupt control release can create additional hazards. Recovery procedures are canopy- and context-specific; learning them properly requires qualified instruction at safe altitude, not trial and error from written text.
14.11 Why understanding stalls matters for landing
The flare reduces airspeed and may bring the wing toward a low-energy, near-stall state close to touchdown. That is acceptable only when managed at the right height and speed. Too high, the wing may lose useful support before the ground arrives. Abruptly raising toggles can add a diving surge. Stall awareness helps explain flat turns, rear risers, braked flares and safe recovery.
PART I / CHAPTER 15Part I · Turning and limits
15. Putting Slow Flight, Stalls and Recovery Together
Picture three photographs of the same canopy: (A) in ordinary full flight; (B) in very deep brakes; (C) recovering from a steep turn. In every photograph, the pilot’s hands are about to move down by the same amount.
Remember the earlier flight-cycle example: releasing deep brakes does not simply move a control to a new position; it begins a changing sequence of pitch, speed and relative pilot movement. Stalls add another layer. The same amount of additional brake can act on a comfortably flying wing, on a wing already near its limit, or on one carrying extra speed from a maneuver. Those are three different aerodynamic starting points.
This is also why a hand-position rule such as “the stall starts at the hips” is unreliable. A useful pilot asks what the wing is doing before treating toggle position as meaningful.
PART I / CHAPTER 16Part I · Energy and glide
16. Energy Management — Altitude, Speed and Options
Why does the canopy accelerate in a dive? Why can a good flare temporarily reduce descent? Why can an ordinary-looking turn become dangerous low to the ground? To answer, think about where the system's energy comes from and where it goes.
16.1 You are continuously losing altitude
After opening, the canopy normally descends. That altitude represents gravitational potential energy. As the system descends, some potential energy becomes movement, while aerodynamic drag dissipates energy into the surrounding air. Imagine a bicycle rolling downhill: gravity supplies energy, some becomes speed, and some is lost to resistance. The details of a canopy differ, but the energy principle is similar.
16.2 Potential versus kinetic energy
Potential energy is associated with altitude. Kinetic energy is associated with movement. A wing high and slow and a wing low and fast store energy in different forms. The distinction affects what they can do next. The important thing is not merely how much speed a wing has, but how that speed fits the pilot's available altitude, space and control margin.
16.3 Why a diving wing accelerates
From stable flight, a diving input makes the descent path steeper. Gravity can accelerate the system along that path, while aerodynamic forces continue acting. Altitude becomes speed. When the pilot releases the diving input, the kinetic energy and suspended pilot's momentum do not instantly disappear. Recovery requires time and altitude.
16.4 No free energy
The speed seen after a diving maneuver did not come from a special extra-power mode. It largely came from altitude spent during the dive. Drag then progressively dissipates it. This is why high-performance landing techniques carry high energy close to the ground; we explain the physics here but do not teach those landings.
16.5 Drag consumes energy
Brake and riser settings change the balance of forces and therefore how speed, descent and glide evolve. Brakes may initially reduce descent, but increasing drag and reducing airspeed eventually limit useful flight. You cannot remain airborne indefinitely by pulling more brake.
16.6 Slower is not always safer
A wing in deep brakes may have little flare energy left, reduced steering responsiveness, small stall margin and even an increased descent rate. A stable wing in its normal flight state may have more useful maneuvering and flare margin. Excessive speed has obvious risks too. The safest state is the one appropriate to what the aircraft must do next, not simply “the slowest.”
16.7 Same speed, different state
Two wings can have similar instantaneous airspeeds while one is in stabilized flight and the other remains pitched, banked or recovering. Identical toggle inputs could have different consequences. Airspeed alone is not a full description of aircraft state.
16.8 Energy and the flare
A flare uses available airspeed and changing aerodynamic forces to flatten the flight path and reduce descent. Starting from full flight, deep brakes or a diving recovery produces different responses. This is why landing cannot be reduced to one universal hand movement and flare height.
16.9 More energy is not automatically better
A fast wing carries kinetic energy that can help produce a powerful flare when properly managed, but also increases the consequences of an error. Increased speed often demands more space and more accurate decisions. There is no need for a new jumper to deliberately add speed before landing to learn energy management.
16.10 Altitude has decision value
Altitude is not only potential energy; it also provides time to observe, navigate, create traffic separation, choose outs and complete a recovery. As you descend, choices disappear. Altitude is decision-making currency. This is a teaching metaphor: it reminds you to preserve options, not merely to fly efficiently.
PART I / CHAPTER 17Part I · Energy and glide
17. The Recovery Arc — What Happens After the Dive
A diving canopy cannot return to ordinary flight instantly. This is where the recovery arc becomes essential. We already know the wing and pilot can keep moving after input stops; now consider that process specifically after diving flight.
17.1 End of input is not end of maneuver
During a significant turn or dive, the wing may bank, steepen, accelerate and swing the pilot outward. Raising the control toward neutral ends the commanded input but does not instantly remove the bank, descent or momentum. The aircraft must return toward another equilibrium.
17.2 What is the recovery arc?
In practical skydiving use, the recovery arc is the flight path and dynamic transition as the canopy-pilot system returns from a diving state toward its normal stabilized flight. The wing may continue descending steeply even after the turn input ends. The full maneuver includes the recovery.
17.3 Heading and dive recovery differ
A wing can stop changing heading and still be diving. Pitch, descent rate, airspeed and pilot movement may remain unsettled. A “correct heading” does not indicate that the aircraft is back in an ordinary flight state.
17.4 Flight cycle versus recovery arc
Flight cycle broadly describes the system's response and return toward equilibrium after an input—such as brake release or a turn. Recovery arc focuses on the return from diving flight. They are related, but the second term is more specific.
17.5 Different wings recover differently
Canopies vary in pitch stability, trim, design and wing loading. Some recover from diving flight comparatively quickly; others continue descending steeply for longer. “Short” or “long” recovery arc are comparative labels, not universal numbers. Wing loading affects speed and response but does not uniquely determine recovery characteristics.
17.6 Natural versus active recovery
A canopy may recover when the input is released, but the pilot can also influence its pitch and flight path through suitable control. Active low-turn recovery is a separate, safety-critical skill that requires direct qualified training. A bad intervention during a high-energy maneuver may cause another problem, including an abrupt pitch response or stall. Do not improvise recovery technique near the ground using written descriptions alone.
17.7 Why low turns injure jumpers
When a turn begins too low, the wing may bank, dive and accelerate. The pilot may reach the intended heading but the canopy can still be descending steeply. If insufficient altitude remains for the entire maneuver, including its recovery, the system can strike the ground with dangerous vertical and forward speed. The threat is not only the number of degrees turned; it is the dive and recovery required.
17.8 No universal safe altitude for a turn
A gentle, flat correction and an aggressive diving turn are not comparable just because both change heading by 90°. Design, loading, initial speed, input rate, bank and recovery all matter. Performing a maneuver successfully once at a given height does not prove there was an adequate margin. A successful outcome is not proof of a good decision.
17.9 Predictability matters near the ground
Landing-pattern flight should emphasize stable approaches, familiar turns and avoiding unnecessary flight cycles. A big heading correction shortly before flare may bring the wing to the desired direction but leave pitch and descent unsettled. Sometimes accepting a small heading imperfection is better than creating a large flight-state problem.
17.10 Canopy changes reset assumptions
A different model or trim can change pitch stability, dive and recovery even at a similar size. Explore the new canopy under coaching and with generous altitude before assuming it behaves like the old one. Do not first discover its recovery arc during low landing-pattern turns.
17.11 Recovery arc is not a performance target
Because recovery arc is discussed in swooping, some jumpers treat it as a feature to optimize. That is not our purpose. For this audience, the skill is understanding that any diving maneuver may require altitude and time to recover—not learning how to create maximum speed near the ground.
PART I / CHAPTER 18Part I · Energy and glide
18. Glide and Range — Where Can You Actually Go?
After opening, you look toward the intended landing area and realize you are farther away than expected. Will you make it? Confidence is not a method. Understanding glide, wind and the geometry of reachable ground helps you choose an appropriate landing plan.
18.1 Glide through air
For a stable flight condition, consider how much horizontal travel through the air the wing obtains for each metre of altitude lost. A flatter glide carries farther; a steeper one carries less. It is useful to distinguish this aerodynamic behavior from how the wind changes travel relative to the ground.
18.2 Minimum sink is not best glide
Minimum descent aims to lose altitude as slowly as practical. Best glide aims to travel farthest horizontally per unit of altitude lost. Those settings are not necessarily identical. Very slow forward flight can result in poor range even if descent rate is reduced.
18.3 Wind changes the ground problem
A steady tailwind may increase ground range toward a target; a headwind decreases it. Even if aerodynamic glide through air remains the same, the brake setting that gives best glide in still air might not give best distance over the ground in a particular headwind.
18.4 Brakes may help—or hurt
Some canopies achieve more efficient air-relative glide with modest brakes. But into a strong headwind, slower airspeed may reduce forward groundspeed so much that the apparent benefit disappears. Avoid universal slogans like “brakes make you go farther.” Learn the behavior of your canopy in different conditions.
18.5 Rear risers and glide
A modest symmetrical rear-riser input can change glide, sometimes beneficially, but excessive rear-riser input approaches a short stall range. This is not a magical technique for stretching back to the DZ. Better to choose a safe reachable alternate than experiment under pressure with an unfamiliar control.
18.6 Projected landing point
Imagine looking forward at a chosen ground reference while flying a stable, straight glide. The scenery appears to flow outward as you approach. This pattern of apparent movement is called optical flow. A point near your projected touchdown may appear almost stationary in your view even as you get closer to it; nearby points tend to move around it.
Now keep the horizon as your visual reference and observe one fixed ground point over several seconds:
The point rises toward the horizon: on your current glide, you are likely to land short of it.
The point stays near the same visual position: it may be close to your current projected touchdown.
The point sinks away from the horizon: on your current glide, you are likely to pass beyond it.
FIGURE 14Editable vector diagram
Optical Flow And Projected TouchdownThree pilot-view panels compare upward, stationary and downward apparent movement of a selected ground point relative to the horizon, assuming a reasonably steady straight glide.
18.7 Don't fixate on the target
A landing area can appear reachable only if you fly directly to it and abandon the normal landing pattern, traffic separation or safe obstacle clearance. That is not a good solution. The goal is not simply to touch the main landing field; it is to arrive at a suitable landing area with enough altitude and room to make a safe approach.
18.8 Alternate landings are valid decisions
A large clear alternate is often better than stretching a marginal glide toward the preferred landing area. Choosing the alternate early, while you still have options, demonstrates judgment. Reaching the main landing field is not a measure of success when it requires a poor or hazardous final approach.
18.9 The pattern is part of range
You may have enough glide to reach the edge of a field but not enough altitude or room to enter a safe pattern. Consider landing direction, obstacles, other canopies and the space required for a stable final. Navigation and landing are one continuous planning problem.
18.10 Wind can change with altitude
Real winds vary with height, terrain and weather. Near-ground wind may be unlike the wind at opening. Gusts, turbulence and different layers affect drift and projected touchdown. Observe continuously and retain alternatives rather than assuming one early estimate cannot change.
18.11 Range and traffic
Different wings at different loadings may cover ground and descend very differently. Jumpers who opened near each other do not necessarily reach the holding area or pattern together. Range awareness supports vertical and horizontal separation, a major topic in the next part of the course.
PART I / CHAPTER 19Part I · Energy and glide
19. Putting Energy, Recovery and Glide Together
Two friends open under identical canopies and head toward the same field. Both are at the same altitude. One is in stable full flight. The other has just made a steep turn, has stopped changing heading, and is still diving.
Recall Chapter 9's small heading correction at two different altitudes. There, control selection mattered because the response after the input could cost recovery space. We can now explain that cost more clearly: the diving canopy has converted additional altitude into motion and may still be changing its flight path. Even when its heading is correct, it has not necessarily recovered its ordinary glide.
Now add a real landing problem. The pilot wants not merely to cross the field boundary, but to arrive with enough time and space for a stable approach and flare. Reaching the field while still diving may leave fewer useful choices than reaching a slightly different open area in stable flight.
PART I / CHAPTER 20Part I · Landing and synthesis
20. The Flare — Turning Flight into a Landing
You have flared on nearly every skydive, but what is actually happening? Why does symmetrical toggle input temporarily reduce descent? Why can the wing travel almost horizontally before losing that support? Why is timing so important? A flare is not simply “braking.” It is a dynamic change in flight path that uses available energy and aerodynamic forces to reduce descent before touchdown.
20.1 Before the flare
You are on final, ideally in a predictable and stabilized flight state. The wing has a relatively steady airspeed and rate of descent, and you hang beneath it. You apply a symmetrical toggle input. The trailing edge deflects, aerodynamic forces change, and the flight path begins to flatten. Your body, with inertia from the previous state, continues moving relative to the wing. The canopy and pilot are not rigidly connected.
20.2 Where the useful flare force comes from
During a flare, the wing's changing shape and pitch modify aerodynamic forces, allowing the system to redirect and reduce downward motion for a time. Drag dissipates energy and the canopy slows. The wing does not create energy out of nothing.
20.3 The phases of the flare
A flare is one continuous maneuver, but its development can be pictured in phases: initial input changes forces and pitch; flight-path flattening reduces descent; continued deceleration consumes airspeed; finishing the flare uses the remaining suitable control range to reduce remaining forward and downward motion for touchdown. These phases are not fixed hand positions or a universal count.
20.4 Why the flare cannot last indefinitely
As drag dissipates energy and airspeed decreases, the wing can no longer maintain the initial flattening forever. If you flare too high, descent may resume or increase while you are still above the ground. The initial flattening may have worked perfectly but occurred too early for the energy available.
20.5 Timing depends on the wing and state
A flare begun too late may not have enough time or distance to redirect the flight path before touchdown. One begun too early may exhaust useful airspeed. Appropriate timing depends on canopy design, loading, current speed and sink rate, control range, and the rate of input. There is no universal flare height for every canopy and pilot.
20.6 Sight picture
You judge flare timing mainly through visual cues—ground movement, apparent height, peripheral vision, terrain and familiar reference features. Looking only straight down at the shoes restricts useful perspective. Looking ahead along the landing path while remaining aware of the ground in the broader field of view often offers a better picture. Featureless terrain can make this harder.
FIGURE 15Illustration planned
Flare PhasesFour side-view snapshots on the same scale: stabilized final, initial flare, flattened path / deceleration, touchdown. Show canopy and pilot motion without implying a rigid pendulum or prescribing toggle positions.
20.7 Continuous versus staged flare
In a continuous flare, the pilot moves the toggles smoothly and progressively while responding to the wing. In a staged flare, the first portion flattens the flight path, sometimes with a brief pause or rate change, before the remaining flare is applied as airspeed decreases. Neither is universally best. The stages correspond to what the wing does—not two arbitrary hand positions.
20.8 Sweet spot
Skydivers call the useful portion of the flare where the wing has substantially flattened its path the sweet spot. It is not necessarily halfway down the toggle stroke, and the exact position varies with the wing and flight state. Reaching it is not finishing the flare; there may still be significant forward speed and a need to continue a controlled deceleration.
20.9 Why the second part matters
A jumper can start the flare at the correct moment and still land hard by stopping the stroke prematurely. The wing slows and the support changes, but the pilot fails to make appropriate use of the remaining control range. Initiation and completion of the flare are different skills.
20.10 A pause is not the goal
Treating staged flare as “pull to position A, count, then pull to position B” can become mechanical. The wing does not know you are counting. The objective is to control its flight path and remaining energy. On a different canopy—or from a different starting state—the ideal progression may change.
20.11 Starting from full flight versus brakes
A canopy in stabilized full flight normally has more airspeed and more unused toggle travel than one already in partial brakes. A braked flare begins with a different pitch, speed, control margin and available stroke. It should not be treated as an identical version of a full-flight flare. Coached high-altitude braked-flare familiarization can build understanding, but it is not a reason to improvise near the ground.
20.12 Starting after a turn
Suppose you make a strong heading correction just before the flare. Your hands may return to full-flight position while the wing is still rolling, pitching or diving. Flaring from that unsettled state can produce a different response than a stabilized approach. A predictable flare begins with a predictable flight state.
20.13 Different wings have different flares
Canopy design, control range, steering-line trim and loading change where useful lift develops and how it is maintained through touchdown. Even similar-sized canopies can flare very differently. Changes in equipment require renewed familiarization and suitable coaching.
PART I / CHAPTER 21Part I · Landing and synthesis
21. Landing Problems — Understanding What Went Wrong
Real flares are not always ideal. Early timing, late timing, uneven hands, unfamiliar wing response, turbulence or an unsettled approach can all create problems. The objective is not to memorize a magical fix for each mistake; it is to understand what the aircraft is doing and follow trained procedures.
21.1 Too early
If the flare begins too high, the wing may initially flatten the flight path but exhaust useful airspeed before touchdown. An instinctive response is to “undo the flare” by abruptly putting the hands up. But that is a new aerodynamic input, potentially causing a surge and dive near the ground. A commonly taught approach emphasizes preserving controlled, symmetrical wing behavior, appropriately completing the remaining flare and being ready for a PLF rather than abruptly dumping brakes. The precise response must be learned for your canopy with an instructor.
21.2 The one-way-street analogy
Treat the flare as a one-way street in the sense that it should not be casually reversed to erase a timing mistake. This is a simplification, not a universal emergency rule. Wing state, altitude and trained procedures determine the correct response. Raising toggles does not rewind time or restore the previous energy state.
21.3 Too late
When the flare begins too late, the aircraft may not have sufficient time/distance to flatten its flight path. An abrupt last-second toggle pull may not avert a hard landing and may create additional problems. Use your trained approach and PLF preparation rather than attempt to rescue a stand-up touchdown at any cost.
21.4 Lucky landings can teach poor habits
A jumper may flare too late, make a large input and stand up by chance because the wing was forgiving or the timing barely worked. The outcome alone does not prove sound technique or a good margin. Debrief the flight state, sequence and remaining options, not just whether you stood up.
21.5 Incomplete flare
Sometimes a jumper begins well, then stops pulling because their feet are close or they become preoccupied with running. This may leave forward speed or descent that could have been managed with the remaining taught flare stroke. Continue flying the canopy throughout the landing.
21.6 Asymmetric flare
Unequal hands introduce an asymmetric trailing-edge command, potentially causing turn or roll at the worst time. A flare needs intentional symmetry except for a specific trained correction. Practice symmetric hand movements on the ground and review actual video when possible.
21.7 Looking straight down
Fixating on the shoes restricts the broad visual cues needed for height and flight-path judgment. Use the taught sight picture, looking ahead along the landing path while remaining aware of the ground and your surroundings.
21.8 Wind and apparent speed
In steady wind, downwind ground speed can be much higher without the wing suddenly gaining aerodynamic speed merely by turning downwind. Do not simply flare higher because the ground looks faster. A downwind landing may require room to run or a PLF; a dangerous low turn to face into wind can be worse than accepting a level-wing downwind landing, subject to the site’s traffic and landing procedures.
PART I / CHAPTER 22Part I · Landing and synthesis
22. Touchdown — The Landing Is Not Over Yet
First contact with the ground is not necessarily the end of flight. The wing may still be inflated, moving and supporting some of the pilot's weight. A premature release or asymmetric movement can change its behavior while you are running or losing balance. Fly the canopy through touchdown—not merely until touchdown.
22.1 First contact is not a switch
During a good landing, support transitions from the wing to the ground progressively. For a brief period, aerodynamic lift and ground contact share the pilot's weight. What you do with the toggles still matters even after the feet first touch.
22.2 Running out the landing
A running landing is not inherently a poor landing. If the touchdown is controlled and you can run safely, keep the appropriate completed flare, maintain even hands and take the necessary steps while the canopy loses useful flight speed. Do not reflexively lift the toggles because your feet touched. An abrupt release can change the wing's flight condition and pull you unexpectedly.
22.3 Don't reach for the ground with one hand
If you stumble, the instinct to put an arm out can raise one toggle while the other remains down, causing an unintended asymmetric command. The extended arm also risks injury. Maintain trained canopy control as appropriate and use a PLF when a controlled run-out is no longer practical rather than trying to catch yourself with a straight arm.
22.4 Running versus PLF
There are times when attempting to remain standing adds risk: excessive groundspeed, uneven terrain, poor balance, unexpected sink or awkward touchdown. The objective is to manage impact, not to perform for spectators. A safe PLF is a successful landing.
22.5 A PLF is a skill, not a last-second improvisation
A parachute landing fall is designed to distribute impact across the body using a trained sequence, keeping feet and knees together and avoiding bracing with a straight leg or outstretched arm. Exact execution is a physical skill requiring periodic supervised ground rehearsal. The PLF should be compatible with continuing appropriate flare control through touchdown. It works better when the jumper is mentally prepared before impact.
22.6 Prepare before you know you need it
Deciding to PLF at the very last instant may leave the body in a poor position. Approach every landing ready to perform a PLF. If the actual touchdown becomes gentle, you can run or stand up as appropriate. The possibility of PLF is not a failure of confidence; it is sound preparation.
22.7 Harness loading during touchdown
Reaching one leg far forward or rotating the hips can shift harness loading and cause heading changes on a responsive canopy. Balanced posture and deliberate preparation matter even when the feet approach the ground. Body and wing are still connected.
22.8 After the wing has finished flying
There is a crucial difference between holding the flare through touchdown and handling an inflated canopy on the ground. Once the landing has ended, wind may keep the wing inflated and drag the pilot. The next task is to collapse/depower it using local procedures appropriate to the equipment and conditions. “Hold the flare” does not mean keep it indefinitely while being dragged. Ground-wind canopy control is a separate skill to rehearse.
FIGURE 16Illustration planned
After TouchdownThree-panel decision illustration: completed symmetrical flare during first steps; prepared PLF when running isn't practical; separate depowering procedure after full ground contact. Do not depict reaching for the ground with an arm.
PART I / CHAPTER 23Part I · Landing and synthesis
23. Landing Priorities — What Actually Matters?
The objective is not to land exactly on a target, point perfectly into wind or stand up for the camera. It is to reach a suitable area, under a controllable wing, with the lowest practical risk to yourself and others.
23.1 Level and controllable before perfect heading
If your final heading is slightly imperfect but a large clear landing area is still in front, a substantial low correction may be worse than accepting the difference. The wing may dive or recover through the flare. Level, controlled flight matters more than correcting every degree of heading.
23.2 Clear ground before target accuracy
An accuracy target is training equipment, not a mandate to disregard obstacles, canopy traffic or stable final approach. Adjust priorities when the plan no longer makes sense.
23.3 Into wind is useful but not absolute
A headwind can reduce groundspeed. But chasing perfect into-wind alignment with a low turn can introduce a larger threat than a controlled crosswind or downwind touchdown. Local landing-direction procedures, traffic, obstacles and maintaining a stable wing can take priority.
23.4 Standing up is optional
A controlled PLF is better than a dangerous attempt to save a stand-up landing. Debrief landing choices and control, not appearance.
PART I / CHAPTER 24Part I · Landing and synthesis
24. Learning from Your Landings
Every landing can strengthen your mental model when you observe what actually happened rather than simply whether the result looked smooth.
24.1 A practical debrief
Approach: Was the wing stabilized before flare? Did you make unnecessary corrections? Was the wing level and the area clear?
Flare start: Was the timing appropriate? Did the canopy respond as expected?
Flare development: Did you flatten the path? Continue appropriately? Finish the stroke? Keep hands even?
Touchdown: Did you continue flying after initial foot contact? Run safely or prepare for PLF? Keep symmetrical control?
After landing: Did you manage remaining wing inflation and move away from incoming canopy traffic safely?
24.2 Why video helps
Your perception during flare is incomplete. Side-on footage can reveal initiation timing, pitch, toggle symmetry, flare completion and remaining ground speed. Review video with a qualified coach when possible. The goal is not to judge aesthetics; it is to compare your prediction with the aircraft's behavior.
PART I / CHAPTER 25Part I · Landing and synthesis
25. Putting the Entire Canopy-Control Story Together
You have finished the physics and control part. The useful test is not whether you can remember every term. It is whether the ideas change what you notice on a normal canopy descent.
One descent, three observations
On an ordinary jump, without adding any unusual maneuvers, notice:
After a normal input: Is the wing still changing flight state even though your hands have stopped moving?
While navigating: What does your selected point on the ground tell you about reachable landing space?
Before landing: Is the canopy stable enough that its flare response should be familiar?
Those three observations deliberately reuse earlier ideas in a new setting. The flight cycle tells you whether a completed input has left the wing settled. The projected landing point applies our airspeed-versus-groundspeed and glide discussions to the terrain ahead. A stable final approach gives your flare the starting conditions you have learned to expect.
These are not three more maneuvers to master. They are three ordinary opportunities to notice the same physics working together. Discuss anything unexpected with a qualified instructor rather than experimenting near the ground.
The purpose of the theory is to make ordinary decisions easier, not to turn every descent into a physics exam.
Next major part — Canopy Airmanship
So far, most of our attention has been on your wing and your control inputs. On a real skydive, many other canopies share your airspace. They may fly with different speeds, descent rates, landing patterns and decisions, yet all approach a limited landing area.
In the next part we will examine the whole canopy descent as one traffic-management problem: awareness after opening; observing nearby canopies; horizontal and vertical separation; holding areas; timing arrivals into the landing pattern; predictable pattern flight; alternate landing areas; and abandoning an unsafe plan early.
The guiding question changes from “How do I make my canopy do what I want?” to “How do I use it predictably and safely in shared airspace?”
PART II / CHAPTER 00Part II · Shared airspace
0. The Big Picture — Your Canopy Is Not Alone
In Part I, you learned how to control your wing. Now imagine a perfect opening, a healthy canopy and a well-executed landing. Could the jump still be unsafe?
Absolutely. Another canopy might be approaching your flight path. A group may still be deploying nearby. Four pilots may be about to enter the same landing area at the same time.
Canopy airmanship is the skill of flying your canopy as one aircraft among others. The challenge is not simply to avoid someone who is already close; it is to recognize when flight paths might become unsafe later.
Canopy control asks: “What will my wing do?” Canopy airmanship asks: “What should I do with my wing, given everyone around me?”
0.1 A four-dimensional picture
Build your awareness around five questions:
Where am I? Relative to the landing area, holding area, winds and obstacles.
Where are the others? Including those above, below or behind you.
Where are we going? Ground track and descent rate, not just heading.
When will we get there? Especially at pattern entry, base, final and touchdown.
What options remain? And which will disappear as altitude decreases?
Distance by itself tells only part of the story. Two distant canopies can be converging on the same location, while two nearer ones may be following paths that maintain separation.
FIGURE 17Illustration planned
Four Dimensions Of Canopy TrafficA top-down map and side profile showing two canopies initially separated but projected to enter the same landing-pattern segment simultaneously; include a time line below.
0.2 A landing is an arrival
The drop zone is not just a point to reach. Your landing needs a suitable area, a safe approach and a place in the traffic flow.
The last part is easily overlooked. You might have enough glide to reach the field and still arrive at the same point and altitude as several other jumpers. A competent canopy pilot thinks about arrival order well before the pattern begins.
Predictability helps everyone. Other pilots cannot know your intentions, but a clearly briefed route and consistent flying give them something to plan around. Predictability does not mean following a bad plan into danger: it means recognizing a problem early enough to change the plan without surprising everyone nearby.
0.3 Our route through this part
We will follow a descent from beginning to end:
Before opening → first moments under canopy → relative movement and vertical separation → holding area → landing pattern → traffic conflicts → changing plans and alternates.
The common thread is simple: make space early, preserve it predictably, and leave yourself useful choices.
PART II / CHAPTER 01Part II · Shared airspace
1. The Airspace Exists Before Opening
Canopy traffic begins to take shape before anyone has a canopy overhead. Aircraft route, exit order, group drift and deployment plans affect where canopies may appear.
The jump run is the aircraft’s path while skydivers exit. Spotting is checking whether the exit location, given the winds and planned freefall, leaves a sensible route to the intended landing area. Neither tells you exactly where every parachute will open.
That means canopy planning begins on the ground, not at line stretch.
1.1 Picture the jump from above
Before boarding, imagine a simple aerial map of the load. Where will the aircraft fly? Which groups leave before and after yours? Where is each likely to deploy? Which jumpers might have unusual opening altitudes or freefall paths?
A load that includes formation groups, movement jumps, wingsuits, tandems or high pulls can create a complex picture. You do not need to lead those disciplines, but you do need to understand how their planned airspace affects you.
Exit separation is not the same as guaranteed deployment separation. Groups may drift or travel during freefall. Two well-spaced exits can still produce unexpectedly close opening areas if the plan is poorly understood or not followed.
1.2 The opening corridor matters
Imagine opening near the aircraft's line of flight. The shortest route to the landing area crosses the place where another group may soon deploy.
Turning directly toward the drop zone could be a poor first choice. Your route after opening needs to account for other groups, not just the shortest distance on the ground.
Breakoff and tracking are covered in your established freefall training; we will not repeat that training here. The point for this handbook is that deployment and canopy navigation are parts of one separation plan.
1.3 Know the local plan
Before boarding, be able to identify:
the current jump run and relevant opening-area restrictions;
the holding area and route to it;
the landing direction, traffic pattern and any separate landing areas;
the group's deployment plan and any unusual traffic on the load;
suitable alternate landing areas and locally established decision points.
The exact altitudes, routes and right-of-way procedures come from your drop zone, instructors and local rules—not from a universal drawing in this handbook. If you do not understand the briefing, ask before boarding.
A plan is still only a prediction. The spot, wind or other jumpers' positions may differ from expectations. Knowing the plan helps you notice the difference; it does not oblige you to follow it blindly.
PART II / CHAPTER 02Part II · Shared airspace
2. The First Moments After Opening
Your canopy inflates. You must determine whether it is suitable to fly, recognize your altitude and avoid nearby traffic. These are not unrelated tasks: they are parts of the same immediate situation.
Assess the canopy without becoming blind to the airspace around it.
2.1 Don't assume the opening matches the plan
An off-heading opening may put you toward another jumper or away from your expected route. Others may have opened higher or lower than you expected. A normal-looking canopy is not proof that the surrounding airspace is clear.
Follow your trained opening checks and emergency procedures, including your decision altitude. While doing so, establish awareness of the direction of flight, nearby canopies, your position and any remaining deployment corridors.
2.2 The first direction is important
Rear risers may be available for steering while the brakes remain stowed, as covered in Part I. That can be relevant when a prompt heading correction is needed after opening—but it must already be a familiar, trained skill. An actual malfunction or collision threat requires the response appropriate to that emergency, not experimentation.
Once the canopy is assessed, resist the automatic urge to aim straight toward the landing area. If another group is still deploying, the planned route to holding may be safer than the apparent shortcut across the opening corridor.
2.3 Turn your scan into a habit
As you leave the opening area, repeatedly update three things:
Wing: Is it flying as expected?
Space: What canopies are above, below, ahead and behind me? What area would my next turn sweep through?
Plan: Can I reach the holding area or a suitable alternate with an orderly route?
“Look before turning” means scanning the airspace you will enter, not merely glancing in the direction you want to face. A canopy hidden above, behind or against the ground may be missed if you stare only at your destination.
PART II / CHAPTER 03Part II · Separation & holding
3. Separation Is a Moving Problem
You look right and see another canopy 100 metres away. Are you safely separated?
You cannot tell from distance alone. If you are moving apart, the gap may grow. If your paths intersect, it may close quickly. And if you are at different altitudes, that separation matters only as long as your descent paths keep it.
The key skill is predicting relative motion.
3.1 Three kinds of separation
Horizontal: How far apart will your ground tracks remain? A canopy ahead may be slower, while one behind may be overtaking.
Vertical: Who is above whom, and are you closing the gap? Different wing designs, wing loadings and brake settings can produce very different descent rates.
Time: Even if you plan to cross the same pattern-entry point, you may be separated if you arrive at different times. Conversely, two distant canopies may be on course to reach it together.
Imagine two pilots descending toward the holding area from opposite sides. They currently look far apart. But if each plans to turn toward the same pattern-entry point and both are at similar altitude, the real problem lies ahead of them, not between them now.
FIGURE 18Illustration planned
Predicting A ConflictThree snapshots of two canopies at different initial positions and altitudes converging toward one pattern entry, contrasted with a sequence where they arrive separately.
3.2 Vertical separation is also arrival planning
A canopy stack is not a fixed tower. The order changes as wings descend at different rates or pilots choose different flight states.
Suppose four jumpers are likely to reach the landing area at approximately the same height. Even if they never come close during the earlier descent, they may crowd the downwind, base or final. That is a sequencing problem worth recognizing while everyone still has altitude and room.
A useful question is not simply “Who is lower?” but:
“Who is likely to enter the pattern ahead of me, and who will arrive behind me?”
An appropriate holding route, natural differences in descent, a briefed separate landing area, or an early change in timing may help keep arrivals apart.
3.3 Can you deliberately adjust timing?
Part I explained that brake input can change descent rate and airspeed. At suitable altitude, an understood and practiced slow-flight configuration may be one tool for managing arrival timing—but not a universal one. On some wings, deep brakes increase sink; a change in airspeed also alters horizontal position and may affect faster traffic approaching from behind.
Similarly, sudden diving turns or unbriefed circles intended to “get lower” can erase vertical spacing and surprise other pilots. Such changes can create more danger than the initial congestion.
The more useful habit is to recognize a converging arrival early, then use the locally briefed, predictable options available at that altitude. Close to the ground is not the time for improvised sequencing.
3.4 Right of way does not replace collision avoidance
Rules about yielding, lower canopies, head-on approaches and overtaking help make behavior predictable. Exact procedures depend on the applicable rules and drop-zone briefing.
But having priority is not protection against another pilot who has not seen you. Neither can you assume the other canopy will move as expected.
Your responsibility to avoid a developing conflict remains, whatever the right-of-way convention says. The actual avoidance response must come from practical local training, not a generic maneuver copied from a page.
When you overtake someone, anticipate the room needed for both canopies and avoid forcing an abrupt response. When someone approaches from behind, consistent flight is more useful than a surprise S-turn undertaken without knowing the full traffic picture.
PART II / CHAPTER 04Part II · Separation & holding
4. The Holding Area — Preparing for the Pattern
You have assessed your canopy, moved clear of the opening area and found the traffic around you. You are not ready to join the landing pattern yet.
The holding area is a region identified in the drop-zone flight plan where jumpers can descend and prepare to join the lower landing pattern. Its location and shape are site-specific. It gives you space to manage position and timing before committing to the lower approach. Think of it less as a point to hit and more as a region where you prepare a predictable arrival.
4.1 What holding accomplishes
A useful holding plan gives you space to:
check the wind and likely ground track;
identify the next pilots likely to enter the pattern;
remain clear of opening and deployment corridors;
confirm the landing direction, approach and alternate areas;
enter the pattern from a suitable position and altitude.
You do not have to fly a perfect circle around an imaginary point. The purpose is to arrive prepared, not to draw a shape. Flying repeated unbriefed circles or S-turns may cut across others' paths and make your intentions harder to predict.
4.2 The holding area moves in your ground picture
Wind changes the relationship between your air-relative flight and the ground. A heading that kept you near the desired holding region in light wind may produce significant drift in stronger wind.
You therefore need to monitor ground track, not just compass heading. Plan where you can remain while still being able to reach pattern entry with an orderly route.
If the planned holding region would take you too far from a suitable landing area, the right decision may be to choose a safe alternate rather than stubbornly trying to occupy the planned region.
FIGURE 19Illustration planned
Holding Area In Changing WindsSimple top-down diagrams for lighter and stronger winds, showing opening area, holding area, pattern entry and a protected route clear of the opening corridor.
4.3 Holding is where sequencing becomes practical
Imagine you see a canopy below you already moving toward pattern entry and another above you traveling faster. You do not have to make both of them fit your original personal schedule.
Instead, observe the likely order of arrival. Where can you remain, on the locally approved route, without cutting across either canopy's future path? Is your own entry likely to leave useful space for the next pilot?
A braked flight setting may be part of a preplanned, coached timing strategy at altitude, but it is not a magic “wait button.” It changes glide and forward speed as well as descent. Never use it near stall or in congested airspace merely to manipulate your place in line.
Good holding is quiet planning, not dramatic flying.
4.4 Know when holding ends
Before leaving the holding area, check whether your current position and altitude support the briefed pattern entry. Look for the other canopies already using the lower pattern.
If the entry would place you too close to another canopy, or if you cannot reach it with a safe approach, reassess while there is still room. Forcing your original entry point is not a goal in itself.
Once you have committed to a low pattern leg, increasingly large corrections and attempts to “re-sequence” other pilots become inappropriate. Your job shifts from broad traffic planning toward maintaining a controlled, predictable approach.
PART II / CHAPTER 05Part II · Patterns & traffic
5. The Landing Pattern — A Shared Agreement
You leave the holding area and begin the approach. Now the space available for improvisation is shrinking.
The landing pattern is not an obstacle course where completing every leg earns points. It is a shared traffic agreement: a way for several pilots to approach the ground while remaining understandable to one another.
5.1 The familiar shape, with a different purpose
We have already seen how unnecessary turning can produce a flight cycle that continues after the heading is correct. That is why a landing pattern is more than a shape drawn on a map: it is a way to arrange the turns early enough that the final approach is predictable.
A conventional landing pattern often has three legs: downwind (generally travelling with the wind), base (turning across toward the final-approach line), and final (the last approach toward touchdown). The actual shape, direction and altitudes come from your drop-zone briefing.
The practical roles are familiar:
Downwind: Travel along the planned flow, assess your height and position, and identify relevant traffic.
Base: Transition toward the final approach. Your room for major changes is narrowing.
Final: Establish a controllable, predictable flight path toward a clear landing surface. Avoid unnecessary turns and prepare to flare.
FIGURE 20Illustration planned
The Shared Landing PatternTop-down view of a conventional downwind-base-final route with holding-area exit, pattern entry, an unobstructed final corridor, and two canopies spaced in time. Include a clear note that heights, handedness and local shape are site-specific.
5.2 Checkpoints give you information, not orders
A planned pattern may use recognizable landmarks and expected altitude ranges. Their purpose is to reveal whether the intended route still makes sense.
Suppose you arrive lower than expected at a familiar downwind reference. The wrong response may be a hurried turn to reach the original base leg. Your actual position and altitude should guide a safer, simpler approach within local procedures.
If you are higher than expected, surprise circles or S-turns in the pattern may solve your personal altitude problem at the expense of everybody else's traffic picture.
A checkpoint is a decision cue, not a demand to fly through a particular coordinate regardless of conditions.
5.3 The wind changes your track
In crosswind, your canopy's heading and track over the ground differ. The planned rectangular pattern may appear stretched or compressed depending on wind direction and strength.
Track the actual ground movement and maintain the briefed pattern flow. Do not make large, unannounced pattern reversals just because the windsock or your preferred into-wind heading has changed; the established common landing direction may be more important for avoiding conflicts.
5.4 Don't race another canopy into final
Imagine another jumper slightly lower and ahead of you on base. Your original plan would bring you into final immediately behind them.
The problem is not how accurately you can turn at the planned corner. It is whether your approach would leave safe space for both pilots.
This is why the pattern must be considered as a traffic flow. You must know who has already committed to final, who may be behind you, and whether a turn would cross someone else's path. Predictable flying helps, but you still have to look.
5.5 Predictability is not rigidity
Following the pattern is valuable because it makes your behavior legible. It is not a reason to preserve a failing approach.
If the pattern becomes unsuitable, change the plan as early and proportionately as possible. At low altitude, the priority narrows toward a clear area, a controllable wing and an appropriate flare or PLF, not a perfectly drawn rectangle.
We will treat that decision in more detail later. For now, remember:
A pattern is successful when it helps everyone make a safe arrival—not when its geometry looks perfect.
PART II / CHAPTER 06Part II · Patterns & traffic
6. Traffic Conflicts — Read the Future, Not Just the Distance
You are flying toward base. Another canopy is visible to your right—not especially close. Should you be concerned?
That depends on where both of you will be in the next few seconds. Seeing a canopy is only the beginning; you must interpret its movement.
6.1 Scan for relationships
As you scan, classify visible traffic in simple terms: above, below, ahead, behind, crossing, closing or moving away. Update that picture rather than staring at one jumper.
A canopy that stays at nearly the same bearing while growing larger may be on a collision course. This is only a clue, not a reliable standalone warning: turns, changing altitude and cluttered backgrounds make relative motion difficult to judge. Ask whether the ground tracks will intersect and whether vertical separation is closing.
Never equate “I can't see anyone” with “the airspace is clear.” A canopy may be hidden behind yours, beneath your field of view or against the terrain.
6.2 The base-to-final trap
The base-to-final transition deserves special attention. Several pilots may be approaching the same final corridor from different routes, each focused on a planned turn and landing point.
Suppose you are about to turn onto final and another canopy is already established there. It may not help to execute your turn perfectly if you emerge too close behind or above them. The more useful observation happened before you entered the turn.
FIGURE 21Illustration planned
A Conflict DevelopsThree top-down snapshots of two ordinary landing patterns converging at the base-to-final transition; show how early route awareness reveals the conflict before the canopies are close. No collision-avoidance maneuver should be inferred from the drawing.
6.3 Different kinds of conflict
Crossing paths: Two pilots approach an intersection in their routes. Distance matters less than whether they will arrive there together.
Overtaking: A faster canopy approaches a slower one from behind. The pilot ahead may not see the overtaking traffic; passing needs space and anticipation, not pressure to move aside.
Closing vertical separation: A canopy higher up descends faster than one below. The higher pilot can catch up in altitude even if the gap initially looks comfortable.
Head-on: Both canopies are approaching along conflicting routes. Learn the applicable right-of-way conventions and the trained collision-avoidance procedures for your location. Do not assume another pilot has seen you or will perform the expected maneuver.
These situations can overlap. For example, you might be closing vertically and converging horizontally at the final-turn corridor.
6.4 Prevention has a bigger window than avoidance
A developing conflict may be resolved by early, appropriate, predictable route choices. An imminent collision is a time-critical emergency and can require a trained response.
This text cannot substitute for practical collision-avoidance training, and no single last-second maneuver works for every geometry. In particular, unplanned S-turns or spirals may create another conflict with traffic you have not seen.
Use your altitude to recognize conflicts before your remaining choices become emergency choices.
Right-of-way conventions coordinate expected behavior; they do not remove your responsibility to avoid a collision.
PART II / CHAPTER 07Part II · Plans & alternates
7. When the Plan Changes — Revise Early, Not Desperately
You expected to be at a particular point and altitude, but the wind, spot or traffic has changed. Do you still follow the original drawing?
A canopy plan is a prediction, not a contract with the sky. Once you open, you gain information that may require a change.
7.1 Not every difference needs correction
It helps to distinguish three situations:
Small variation: The plan remains suitable. You may not need to change anything.
Meaningful deviation: An early, deliberate adjustment can restore a safe, predictable route.
Failed plan: Reaching the intended route or field would require dangerous shortcuts, loss of landing options or major low turns. Choose a safer objective.
Overcorrecting every minor difference can be as harmful as refusing to change a clearly unsuitable plan.
7.2 Ask the question your altimeter cannot answer
A planned checkpoint may tell you that you are higher or lower than expected. It does not command you to make the next turn regardless of your actual position.
Suppose you reach the downwind reference lower than planned. Instead of asking “How do I cut back to the original base turn?” ask:
“What safe landing path remains from where I actually am?”
If you are too high, an extra turn or circle within congested traffic may be just as poor a response. A correction has costs: altitude, distance, recovery and predictability.
7.3 Decisions become simpler as you descend
Think of the descent in three broad decision windows, not universal altitude bands:
Early: Choose a reachable area, assess traffic and wind, and retain several possible routes.
Before the pattern: Commit to a suitable area and predictable approach, or make an early change while there is still room.
Low: Fly a controllable approach to clear ground. Stop trying to rescue a preferred landmark or a perfectly shaped pattern.
FIGURE 22Illustration planned
Decision WindowsA canopy descent shown in three broad phases: early wide choice of landing areas; pattern-entry choice narrowing; low approach emphasizing level wing and clear path. No fixed numerical altitudes.
The operational altitude gates and procedures must come from the DZ briefing and qualified instruction.
7.4 Wind and traffic can make a plan obsolete
A changing wind may shift your ground track. It does not automatically justify an independent last-second reversal of the common landing direction, especially when others are already committed.
Likewise, a crowded primary field may make a briefed secondary area preferable if chosen early enough. Crossing busy traffic low to reach an apparently empty patch may be worse.
This is why Plan B belongs in the pre-jump briefing. When Plan A stops working, you should already know the general possibilities—not discover them for the first time while running out of altitude.
PART II / CHAPTER 08Part II · Plans & alternates
8. Alternate Landing Areas — A Good Decision Made Early
You open farther from the drop zone than expected. The main landing area may be reachable, but you are not sure you could arrive with room for a safe final. Below you are several open-looking fields.
Which should you choose?
The key is to stop treating the main field as the only acceptable answer. An alternate is part of the original flight plan, not evidence that the jump has failed.
8.1 Reachable is not the same as suitable
You may have enough glide to arrive above a field yet insufficient room to approach and land there. Before committing, consider:
whether the area is large and clear enough for an imperfect touchdown;
whether you have an unobstructed approach and space for a controlled final;
wind, obstacles and likely turbulence;
other canopy traffic and possible conflicts;
how confident you are in what you can actually see.
A wide, forgiving landing area is often preferable to a small target surrounded by hazards, even if the larger area means a long walk back.
8.2 Hazards can hide in plain sight
From altitude, a field may look uniformly green. On closer inspection, it might contain wires, posts, ditches, fences, uneven terrain or soft ground.
Power lines are particularly deceptive: cables may be hard to see, but poles, towers and cleared corridors can reveal them. Trees, buildings and slopes can disturb wind on their lee side. Roads contain moving traffic and obstacles; water and drainage channels can present their own hazards.
Satellite imagery helps with pre-jump orientation but does not prove that a field is currently clear or accessible. Local knowledge and recent observation matter.
FIGURE 23Illustration planned
Selecting An AlternateOverhead sketch showing a preferred DZ area that cannot be reached with a usable final, and two alternative fields. Mark approach corridors, obstacles, power-line poles, wind and canopy traffic. Do not imply that one field is universally correct.
8.3 Select an approach, not just a patch of ground
The question is not “Can I reach that green area?” but “Can I arrive over a suitable area with a safe flight path remaining?”
Choose an area early enough to establish a controlled final. Reassess only if new information changes its suitability. Continuing toward the preferred DZ until it is barely reachable may leave no altitude to inspect obstacles, organize the approach or avoid other traffic.
An into-wind landing can reduce groundspeed, but do not sacrifice a controllable, level approach for a hazardous low-altitude turn. On unfamiliar terrain, be prepared for a PLF even if the field looks smooth.
8.4 After an off-field landing
First manage the canopy and your own condition according to the wind and your training. Be aware of other canopies that may land nearby.
If someone is hurt, follow local emergency procedures and get help. If uninjured, contact the drop zone using its agreed method. Consider roads, animals, fences, private property and retrieval hazards before moving or attempting to recover equipment.
A successful off landing is not judged by how close it was to the hangar. It is judged by the safety and quality of the decision made with the information available at the time.
Where We Go Next
We have now followed an ordinary canopy descent from the jump plan to the landing area. The next airmanship material can build on this foundation by considering mixed canopy performance, changing weather, visibility and integrated traffic scenarios—without retelling the entire descent each time.
PART II / CHAPTER 09Part II · Conditions & judgment
9. Mixed Canopy Traffic — Not Everyone Flies Like You
A load opens successfully. One jumper is beneath a large student-style canopy, another flies a smaller sport canopy, and a tandem is descending toward its own landing area. All three are heading generally toward the drop zone.
Will they stay in the same order until touchdown?
Not necessarily. Different canopies can cover different distances, descend at different rates and respond differently to the same wind. The order you see after opening is not a promise about who will land first.
9.1 Compare paths, not canopy sizes
Canopy size is a clue, not a complete performance specification. Wing loading (suspended weight relative to canopy area), wing design, normal hands-up flight configuration (trim), brake setting and pilot inputs all influence flight. A smaller wing is not automatically below a larger one at every moment, and two similar-looking wings may behave differently.
The practical question is: How is that particular canopy actually moving relative to mine?
Watch both its ground track and its change in altitude. A canopy ahead that grows steadily larger may be moving more slowly than you. A canopy below you may be descending more slowly, allowing you to close vertically. Either observation should prompt you to re-evaluate your route while there is room.
9.2 Overtaking is a decision, not a surprise
Imagine you are approaching a slower canopy from behind. Its pilot may not see you. If you simply continue along the same line, you may end up sharing a narrow corridor near the landing pattern.
Do not count on the slower pilot moving aside or making a turn just because you are approaching. Nor should the slower pilot make unpredictable S-turns to avoid being overtaken.
The better plan starts earlier: understand which route or designated landing area you are expected to use, keep a suitable lateral margin, and avoid setting up a pass that leaves either canopy without room for its next turn. Right-of-way details belong to your local briefing; avoiding a collision remains everyone's responsibility.
9.3 Different landing areas need different approaches
Some drop zones separate student, tandem, standard sport and high-performance landings by location, arrival time, or both. The arrangements vary, so do not assume that a clear-looking field is available to you.
A high-performance pilot may arrive rapidly from an unexpected-looking direction; a large canopy may occupy a long, slow final approach. Neither should force the other to improvise close to the ground.
Before boarding, find out:
which landing areas and approach corridors apply to you;
whether another group uses a different pattern or landing direction;
where those routes might intersect;
how mixed traffic is sequenced on that load.
We are not studying high-performance landing techniques here. We are learning how different types of traffic can share airspace without sharing the same approach.
9.4 The wake is part of the traffic picture
Another canopy disturbs the surrounding air as it flies. Its wake may persist for a time and be displaced by the wind. You cannot see the turbulence just because you can see the canopy that created it.
This matters particularly when following another wing on final, including a large tandem canopy. Do not assume that matching another pilot's line puts you in undisturbed air. Your locally briefed approach should preserve suitable separation from other canopies and their recent flight paths.
We will consider other turbulence sources next.
PART II / CHAPTER 10Part II · Conditions & judgment
10. Wind and Turbulence — The Air Mass Is Part of the Route
Imagine flying toward a familiar landmark. Your canopy feels normal, but the landmark approaches much more slowly than it did on your previous jump.
Has your wing lost performance?
Perhaps not. You may simply be flying into a stronger headwind.
In Part I, we distinguished airspeed from groundspeed. Now that distinction becomes a navigation decision: the wing responds to the air around it, while your landing plan depends on where the wind carries you over the ground. The same heading can produce a very different route in changing wind.
10.1 The wind changes your route over the ground
Your canopy flies through moving air. The wind carries that air mass over the ground.
A tailwind increases your ground progress along its direction. A headwind reduces it. In a crosswind, you can point the canopy somewhat into the wind to maintain a desired ground track—often called crabbing.
This means two pilots making the same air-relative turn may draw different shapes over the ground if they are flying in different winds or at different altitudes.
Before each jump, understand the expected winds aloft and near the landing area. Under canopy, compare those expectations with what the ground is actually doing beneath you.
10.2 Winds aloft are not surface winds
Wind speed and direction can change with altitude. A route that gave you plenty of progress high up may behave differently closer to the ground.
For example, a strong headwind aloft may become weaker nearer the surface. Your airspeed may remain broadly similar while your groundspeed increases as you descend into that lighter headwind. The sight picture changes even though you have not deliberately accelerated your wing.
The reverse can also occur in different conditions. Do not plan an entire descent from one windsock observation or one high-altitude drift estimate.
10.3 Turbulence is different from steady wind
Steady wind changes your ground track. Turbulence changes the airflow encountered by the wing from moment to moment. It can produce unexpected movement, changes in lift, heading disturbances and reduced control margin.
Common sources include:
Obstacles: trees, buildings, hangars, ridges and terrain can disturb the flow, especially downwind of them.
Other canopies and aircraft: their wakes may occupy airspace you intend to cross.
Thermal activity: uneven surface heating can produce rising and sinking air.
Wind shear and gusts: wind may change rapidly across a short distance or time.
A smooth-looking landing field can still have turbulent air above it. Think about where the wind has travelled before reaching your approach, not only where the ground looks clear.
10.4 Avoidance is more reliable than improvisation
If the expected conditions exceed your experience or your canopy's appropriate operating limits, the best decision may be made before boarding.
If a known area is turbulent, select an appropriate, briefed landing route that avoids it rather than planning to solve the problem with a special control technique a few metres above the ground.
Do not assume that holding deep brakes automatically makes a canopy more stable in turbulence. Nor should you treat “hands all the way up in every gust” as a complete universal procedure. The appropriate handling depends on the canopy and manufacturer/instructor guidance. You still need a controllable heading, suitable airspeed and a planned landing response, including PLF readiness.
A wind or gust limit imposed by the local operation is not a challenge to beat. Your personal limit may reasonably be more conservative.
10.5 Changing landing winds can create traffic conflicts
In light or shifting wind, an individual pilot might see a windsock change and decide to reverse the landing direction. But other canopies may already be committed to the established approach.
That can turn an ordinary wind change into opposing traffic on final.
Understand who establishes the landing direction and how changes are communicated at your drop zone. A common, predictable direction often matters more than each pilot independently chasing a momentary wind indication.
PART II / CHAPTER 11Part II · Conditions & judgment
11. Visibility and Observation — What You Cannot See
You scan to your right. The airspace looks clear. You turn—and discover another canopy where you did not expect it.
How could that happen?
Because looking in a direction is not the same as seeing everything there. The wing, the sun, distance, background clutter and your own attention all limit what you can observe.
11.1 Every canopy has blind areas
Your canopy, risers, helmet and body position can block parts of the view. Another pilot may be similarly unable to see you. A canopy that disappears behind your wing during a turn has not necessarily moved away.
Make scanning an ongoing habit. Include the intended flight path, both sides, and likely traffic above and below. Check the airspace before a turn, then continue monitoring the new sector as you fly. Scanning must not become a reason to stop navigating or neglect the altimeter.
11.2 Apparent motion can be deceptive
A canopy that seems to move rapidly across your field of view is easy to notice. More concerning is one that remains near the same visual bearing while growing larger: under suitable relative-motion conditions, that can indicate the separation is closing toward a possible collision.
This is a warning clue, not a precise collision calculator. The other pilot may turn, your own descent may change, or the canopy may be hidden briefly. Never use “it looked stationary” as the sole basis for a maneuver.
The practical lesson is to notice trends, not just locations: growing, shrinking, rising, falling, moving across your view, or disappearing behind an obstruction.
11.3 The environment changes what you can know
Low sun can create glare. Haze reduces contrast. A canopy can be hard to distinguish against trees, roofs or distant terrain. Clouds can hide other jumpers or obscure the ground features needed for navigation.
There is a difference between an area that looks empty and an area you can reliably observe.
If visibility or cloud conditions do not allow you to maintain the required awareness and comply with applicable flight rules and DZ procedures, that is a reason not to jump. An unexpected loss of visibility in flight requires the specific procedures taught for your operation, not an improvised blind turn toward a guessed landing point.
11.4 Attention has blind spots too
A pilot fixated on a landing target may overlook a canopy approaching from the side. A pilot worried about reaching the drop zone may stop checking vertical separation. Someone concentrating on their first braked-flight exercise may fail to notice the holding area approaching.
Use a simple recurring scan: traffic, route, altitude, options. These are not four separate tasks to perform mechanically; they are a way to keep your awareness broad enough for the whole descent.
PART II / CHAPTER 12Part II · Conditions & judgment
12. One Descent, Many Decisions — An Airmanship Exercise
Let's put the pieces together without turning the chapter into another list of rules.
Imagine a normal sport jump at a drop zone you know. Before boarding, the load is briefed on the landing direction, holding region, standard approach and an alternate field. There are several different canopy types on the load, including a tandem that uses a designated landing area. Winds aloft are stronger than the surface wind, and a hangar sits near one edge of the main field.
Now follow one jumper through the descent.
12.1 Before exit: make a prediction
Your group is not first out. The exit order and the intended opening area should help separate deployments, but the canopy picture is not guaranteed.
You know the planned direction to the holding area. You also know that faster and slower wings may arrive at the pattern in a different order from the exit order.
Question: Which parts of this plan can you establish before boarding, and which can you only verify after opening?
12.2 After opening: the picture changes
Your canopy is healthy. You locate the holding area and check for traffic.
A larger canopy is ahead and below, moving slowly across the ground. Another sport canopy is farther to one side. The tandem is already progressing toward its designated area.
The larger canopy is not necessarily going to land last. You need to compare the actual ground tracks and relative descent, not guess from size.
Question: How would you determine whether the larger canopy is becoming an overtaking problem? What would make your expected arrival order change?
12.3 Before the pattern: a decision becomes available
The wind is carrying you farther across the ground than expected on one leg. You remain able to reach the main field, but your planned pattern entry is becoming awkward. A clear, briefed alternate is also reachable.
Other pilots are moving toward the standard pattern. You could try to regain the original drawing with additional turns, or you could make an early, predictable adjustment that respects the established traffic flow and your local procedures. If a safe standard approach no longer exists, the alternate may be the better objective.
Question: What information would make you retain the main field? What would convince you to commit to the alternate? At what point does repeatedly reconsidering become a hazard of its own?
12.4 Final: the aim is no longer to perfect the plan
Suppose you have now established a clear final approach. The wind near the ground differs from the wind aloft, and the hangar's downwind side may contain disturbed air.
You are slightly off your preferred landing spot, but your wing is level and there is clear ground ahead.
This is not the moment to recover a perfect target with a large new turn. It is the moment to land the canopy you are actually flying, on the approach you have safely established. Complete the flare appropriate to its flight state, remain ready for a PLF, and continue flying through touchdown.
After landing, clear the landing area according to local procedures and remain aware of incoming canopies.
Question: Which earlier decisions made this final approach easier? Which unresolved problems would have become much harder here?
12.5 The exercise has no single scripted route
Change one assumption and the best plan may change too:
The larger canopy is descending faster, not slower.
The surface wind has shifted and several pilots are already committed to one landing direction.
Glare hides part of the approach corridor.
The main field is reachable but no longer offers a safe final.
There is no universal sequence of toggle and riser inputs that solves all four versions. Good airmanship combines observation, a workable route, appropriate timing and an honest assessment of remaining choices.
End of Part II — Canopy Airmanship
You began this part looking at one wing among many. You end it with a complete descent: planning the airspace, observing the other pilots, managing timing, selecting a safe approach and recognizing when conditions make the original plan unsuitable.
Part I helped you understand and fly your canopy; Part II helped you use it safely among other canopies and changing conditions. Part III — Equipment, Progression & Currency takes the next step: choosing a suitable parachute system, judging when to change it, and maintaining the skills you need to use it safely.
PART III / CHAPTER 00Part III · Equipment & progression
0. The Big Picture — Equipment, Progression & Currency
You've learned how a canopy flies, and how to fly it among other people. Now we need to ask a different question:
How do you choose equipment that suits the pilot you are today—and recognize when that choice needs to change?
This begins surprisingly early. You finish your training, obtain a license, and start using different rental rigs. Someone offers to sell you a complete system. Another jumper recommends a smaller main canopy. A third tells you that buying your own equipment will immediately make you more consistent.
There may be something useful in each opinion. But they are answering different questions.
Owning a rig, choosing a canopy, changing equipment and maintaining your skills are related decisions. None is proof that you have become a better pilot.
Three things that need to fit
Think of your equipment decisions in three layers.
The pilot. Your skills, recent jump frequency, body size, experience on the particular wing, and the conditions in which you normally jump.
The parachute system. The main canopy, reserve, harness/container, deployment system, automatic activation device (AAD), and other components must be appropriate both individually and together.
The job. Ordinary solo jumping, group jumping, different drop zones, local winds, landing areas and any future discipline-specific needs.
A rig that is suitable for somebody else may be unsuitable for you. Even a perfectly functioning rig may be the wrong choice if its harness does not fit you properly or its canopy is too demanding for your current skills.
Ownership is a responsibility, not a graduation ceremony
Having your own equipment can be excellent. It provides familiarity, a consistent fit and the opportunity to understand one system well. But ownership also means keeping track of maintenance and service status, recognizing when something needs an expert inspection, and resisting the pressure to jump equipment merely because you paid for it.
And progression does not mean continually downsizing. It may mean learning your current wing better, becoming more accurate and predictable, recovering skills after time away, or deciding that a larger, less demanding canopy better suits your circumstances.
This part will cover five connected subjects: your first rig, canopy selection, downsizing, currency, and equipment care. We will approach them as decisions rather than shopping lists or milestones.
The first question is the one new jumpers often face sooner than expected: Should I buy a rig yet?
PART III / CHAPTER 01Part III · Equipment & progression
1. Your First Rig — When and What to Buy?
You have recently earned your license. Renting equipment for each jump is starting to feel expensive, and you're tired of adjusting to a different harness or canopy from one visit to the drop zone to the next.
Then someone says, "I've got a rig for sale. It will fit you—and you can downsize into it later."
It sounds convenient. Perhaps it is even a good deal.
But before thinking about the price, ask a more basic question:
What aircraft are you buying, and is it appropriate for the pilot you are now?
1.1 You don't have to buy immediately
Buying your first rig can give you consistency. You can become familiar with its deployment system, emergency handles, canopy response and harness fit. If you jump regularly, ownership may eventually make financial sense as well.
There are good reasons to wait, too. You may still be learning which canopy size and model work best for you. A drop zone may have suitable rental equipment and instructors who can help you explore options. Your jump frequency may be unpredictable. Or you may simply need more time to save enough for a complete, appropriate system.
There is no universal jump number at which buying becomes mandatory—or automatically wise.
A useful question is not, "Am I experienced enough to own a rig?" It is:
Can I identify equipment suitable for my current needs, and do I have qualified help to verify the choice?
If not, renting and continuing to learn may be the better investment for now.
1.2 You're buying a complete parachute system
A listing might say "complete rig" and show an attractive photograph. But the system contains several components with separate jobs and requirements:
Main canopy: the wing you expect to fly and land on ordinary jumps.
Reserve canopy: the parachute you may need to deploy and land in an emergency.
Harness and container: the structure that fits your body and houses the two canopies.
Deployment and release components: including risers, pilot chute, bridle, deployment bag, container closing loops and pins, and emergency handles, as applicable to the system.
Automatic activation device (AAD): when fitted, a backup device with its own operating and maintenance requirements.
Reserve static line (RSL) or main-assisted reserve deployment system (MARD): where fitted, additional systems whose operation and limitations you must understand.
These parts must be compatible. A canopy may be perfectly airworthy while being the wrong fit for a particular container. A harness may be in excellent condition but fit your body poorly.
Think of a complete rig as a system, not a collection of bargains.
1.3 Start with the canopy you should be flying today
Suppose you have been landing a suitably large rental canopy consistently. You're beginning to understand its flare, landing pattern and responses, including in the normal range of conditions permitted by your instructors.
Someone offers you a complete rig with a substantially smaller main.
It may be tempting to argue that you will learn to fly it after buying it. But the purchase would then be determining your progression, instead of your progression determining the purchase.
That reverses the sensible order.
Begin with an instructor or canopy coach who has actually observed your flying. Discuss a suitable main canopy size and type now, considering its handling, landing performance and the environments in which you jump. We will examine those variables more carefully in the next chapter.
Do not select a canopy primarily because it looks good in the container, matches a friend's equipment or has an attractive resale price.
1.4 The reserve is not an afterthought
It is easy to spend hours comparing main canopies and hardly think about the reserve.
But if you need it, you will be the pilot who has to land it. The reserve's size, design, loading and manufacturer limitations matter independently of the main.
Do not assume that a reserve is suitable simply because it fits inside a container, or because another jumper of similar weight has one.
Discuss the reserve with an appropriately qualified instructor and rigger. Check the reserve manufacturer's operating limitations and the container manufacturer's approved compatibility information. Do not let a desire for a smaller-looking rig dictate the reserve you will have available in an emergency.
1.5 A container has two kinds of fit
When someone says "the container fits," they might mean either of two very different things.
Canopy fit: The main and reserve canopies pack appropriately into their respective compartments. The manufacturer may list recommended combinations or tested packing-volume ranges. Nominal canopy area alone is not enough to establish compatibility; different designs and materials can pack very differently.
Harness fit: The harness fits your body. Its shoulder, torso, hip and leg-strap geometry should permit secure, comfortable use with the handles and controls accessible as intended.
Both matter.
For example, a container may hold an appropriate main and reserve but have a harness built for somebody with a different torso length. Or the harness may fit beautifully while the container is unsuitable for the parachutes you intend to use.
Do not rely on a seller's "I'm about your size" estimate. Have the system inspected and its fit assessed by an appropriately qualified rigger or dealer, using manufacturer guidance.
1.6 The future-downsize trap
Here's a very common sales pitch:
"Buy this smaller container. Put your current canopy in it for now, and when you downsize you won't need another rig."
Sometimes a container genuinely accommodates a range of suitable mains. But this isn't something to assume from approximate square footage, and it must not become an incentive to fly a smaller wing prematurely.
An oversized main may be a poor or unacceptable fit for the container. Later, a much smaller canopy might also be a poor fit. Both questions require manufacturer-specific confirmation, not just somebody's experience forcing a canopy into a deployment bag.
More importantly, you don't yet know whether you will need or want to downsize.
Choose equipment for a safe, useful period of ownership—not for a progression schedule that exists only in your imagination.
Performance Designs explicitly cautions against buying a container before deciding on a suitable main size, and United Parachute Technologies explains why same-size canopies can have different packing volumes. These are practical examples of a broader compatibility principle, not rules limited to those brands.
1.7 New versus used
New equipment may offer a harness built to your measurements, a known history, current manufacturer support and greater freedom to specify compatible components. It usually costs more and may take time to obtain.
Used equipment may make ownership more affordable and may be available sooner. It also comes with a history you must establish rather than guess.
Used does not automatically mean unsafe. New does not automatically mean appropriate.
For a used system, ask for component information and documentation, including, as relevant:
manufacturer, model, size, serial number and date of manufacture for the main, reserve and container;
documented repairs, alterations, service bulletins and known damage;
main canopy jump history and available line-set history;
reserve packing and inspection records, including the applicable repack status;
known reserve deployments (reserve rides), the circumstances of those deployments and any subsequent inspections or repairs;
AAD model, serial number, age, mode and maintenance/service information;
confirmation that the actual main, reserve and container combination is suitable;
confirmation that the harness fit is appropriate for you.
Not all sellers will have a perfect record of every previous jump. An uncertain history is not automatically disqualifying, but it increases the importance of expert inspection and an informed decision.
Arrange an independent pre-purchase inspection by a qualified rigger, including the actual components and their compatibility, before the transaction becomes final. Agree with the seller in advance how the inspection, any deficiencies and the purchase decision will be handled.
The rigger can assess equipment condition and suitability within their qualifications; your instructor or canopy coach should help assess whether the main and reserve choices match your ability and planned use.
1.8 The purchase price is not the whole cost
A seemingly inexpensive used rig may require work before it is ready for use. A new system may also require accessories and setup.
Consider the total cost of ownership: inspection and reserve packing, any approved repairs or harness alterations, possible main-line replacement, AAD servicing or replacement, shipping and taxes, and recurring maintenance.
There are also costs that do not appear on a receipt: time spent resolving compatibility questions, and the opportunity cost of buying the wrong system and having to sell it again.
Budget for coaching and continued jumping, not only the equipment. A rig is not a substitute for either.
1.9 When you first jump the rig
Taking ownership is not the final step.
A properly fitted system still needs an appropriate briefing and familiarization before its first jump: where the handles are, how deployment is performed on that system, what connected devices are fitted, and how your trained emergency procedures apply to its actual configuration.
Have the equipment checked according to the manufacturer's instructions and your local procedures, and rehearse relevant actions with a qualified instructor. If the canopy or deployment configuration is unfamiliar, plan its introduction conservatively rather than combining it with a complicated group jump, unfamiliar drop zone or demanding conditions.
Equipment that has passed inspection is not automatically familiar equipment.
1.10 A practical buying sequence
Here is a useful order for making the decision—not a shopping checklist that replaces expert inspection.
First, identify your present flying needs. Which canopy are you currently competent to fly? What do your instructors and landing observations say?
Second, agree on suitable canopy and reserve choices. Include the conditions and landing environments you actually encounter, not just ideal days.
Third, check the complete system. Ask a qualified rigger or dealer to confirm manufacturer compatibility, physical fit and equipment condition.
Fourth, compare real costs and histories. New, used, rental and demo options may all make sense under different circumstances.
Finally, introduce the equipment deliberately. Get familiar with its exact configuration before the jump, then build experience on it rather than immediately changing something else.
This sequence may take more time than buying the first attractive listing. That's a feature, not a problem.
Where we go next
We now have a sensible purchase sequence, but one of its first decisions still needs more explanation: what makes a main canopy suitable for a particular pilot?
In the next chapter we'll connect the flight behavior you learned in Part I with size, wing loading, planform, trim and canopy design. That will prepare us for a more difficult question: when, if ever, should you change to a smaller or more demanding wing?
Further reading
Skydive Mag — Buying and Selling Used Skydiving Gear — practical advice on verifying the seller, checking the equipment history and arranging independent inspection. Written from a gear retailer's perspective; use it as supplementary advice.
PART III / CHAPTER 02Part III · Equipment & progression
2. Choosing the Right Canopy
Imagine two jumpers discussing their parachutes. Both fly canopies sold as the same nominal size. One describes a relaxed, predictable wing; the other describes a canopy that turns quickly, dives more noticeably and demands precise flare timing.
How can two canopies of the same nominal size feel so different?
Because size is only one part of what you are choosing. You are choosing a wing with a particular design, speed range, control response and recovery behavior—and you are choosing how those characteristics interact with your experience.
In Chapter 1 we established the order: identify a suitable main canopy before choosing a container around it. Now let's examine what suitable actually means.
2.1 What job does your canopy need to do?
Start with your ordinary jumps, not the most exciting jump you imagine doing several years from now.
Your canopy needs to open reliably within its intended operating conditions, give you adequate control throughout the descent, allow predictable navigation with other canopies, and let you land safely—including when the wind is light, your approach is imperfect or you need to use a suitable alternate landing area.
You may have preferences: a comfortable flare, manageable toggle pressure, a particular glide characteristic, or openings appropriate to the kind of skydiving you do. Those are legitimate reasons to compare models.
But the first question is not “How much performance can I buy?” It is “Which flight characteristics can I use consistently and safely?”
2.2 Wing loading matters, but it isn't a complete answer
You met wing loading in Part I: the suspended weight of the jumper and equipment relative to the wing's area. Canopy manufacturers often publish it using pounds per square foot, even when the rest of your training uses metric units. The important thing when comparing figures is to use the correct total exit weight, including equipment, and the manufacturer's stated canopy area.
For a particular canopy design, more loading generally means greater speed and a more energetic flight. Mistakes can require more space and time to recover from.
However, equal wing loading does not mean equal handling. A smaller wing, flown by a lighter jumper at the same loading as a larger wing flown by a heavier jumper, may respond more quickly because its physical size and line lengths differ. Likewise, two different models at identical loading can behave differently because they were designed differently.
So wing loading is a useful comparison, not an automatic measure of readiness. Manufacturer operating limits are limits or recommendations for the equipment; they are not proof that a particular pilot has the skills to fly it.
2.3 Shape and design matter
Look at a canopy from above. Its outline is called its planform. Some wings are comparatively rectangular; others taper toward the tips and are often called elliptical or semi-elliptical.
Taper and other design choices influence how a canopy turns and responds. But don't reduce canopy selection to rectangular equals safe and elliptical equals dangerous. Real canopies differ in airfoil, trim, line geometry, construction and intended use. The complete design matters more than one label.
A model intended for a newer recreational pilot may prioritize different handling qualities from one designed for highly experienced canopy pilots. Those differences can remain substantial even at the same nominal size.
Changing model can be a significant progression step even without downsizing.
2.4 Connect the specifications to flight behavior
Remember the concepts from Part I. They give you a way to ask meaningful questions about a canopy rather than shopping by reputation.
Characteristic
What you want to understand
Trim and glide
How does the canopy travel through the air, and how does that affect reaching a landing area?
Turn and roll response
How much input produces a heading change, and how quickly does the wing react?
Recovery arc
After a diving turn, how long does the canopy take to return toward ordinary flight?
Brake and stall range
How much useful slow-flight control is available, and what happens near its limits?
Flare behavior
How does the wing reduce descent and forward speed, and how sensitive is the timing?
Opening behavior
How consistently does it inflate and establish controllable flight within its intended deployment conditions?
These aren't six independent scores that can simply be added together. A feature you like in one situation can create a disadvantage in another.
For instance, a wing that dives and retains speed more readily may feel exciting during turns. But the same response demands more respect during an unintended low-altitude correction. A flatter glide may be useful when you open far from the landing area, but it doesn't compensate for a canopy you cannot land consistently.
The purpose of comparing characteristics is to understand the trade-offs of the whole aircraft.
2.5 Opening characteristics belong in the decision
It's easy to compare canopy models only by how they fly after opening. But the opening is part of every normal skydive.
Different models may vary in opening speed, heading consistency and the altitude used during deployment. Packing, maintenance, deployment configuration, airspeed and body position can affect the opening as well.
A canopy's advertised reputation cannot predict every opening, and no wing can promise identical deployments every time. Ask about its intended use and manufacturer recommendations, particularly if you perform a discipline that changes deployment conditions.
A main canopy should be evaluated for the complete skydive, not just its landing characteristics.
2.6 The canopy you know versus the canopy you want
Imagine you are consistently landing your current canopy and beginning to feel that it is too ordinary. Another jumper offers you a smaller, more responsive wing at an attractive price.
You may be tempted to buy it and start jumping it immediately. But even a seemingly modest change can alter the flight cycle, turn response, landing speed and error margins you've spent time learning.
Now imagine a slightly more subtle plan:
“I'll buy the smaller canopy now, but I won't actually jump it until I'm ready.”
That sounds cautious. Sometimes it is sincerely intended. But owning the canopy changes the situation. It is sitting in your gear bag. You've already spent the money. Your friends know you bought it. Perhaps the seller says you should try it, or a good-weather day makes you feel ready.
The planned waiting period can quietly turn into a negotiation with yourself: just one jump, just to see how it opens, I'll be careful.
Buying equipment intended for a future skill level creates pressure to reach that level—whether or not your actual skills have caught up.
That is a reason to be wary of buying a smaller main either for immediate use or for some imagined future date. Waiting to purchase is often simpler and safer than having to resist the temptation to fly an unsuitable wing you already own.
This is separate from the container-fit trap we discussed in Chapter 1: you shouldn't let either a pre-purchased canopy or a smaller container dictate when you progress.
2.7 Familiarity is valuable; new equipment needs new familiarity
You already know how much your current wing dives after a turn, roughly how it responds to brakes and where its flare develops. On another model, those expectations may no longer hold.
If an instructor recommends trying a different canopy, treat it as a planned change in aircraft, not just a swap of equipment. Confirm suitability and compatibility, review its operating limitations, choose appropriate conditions and arrange a conservative familiarization with qualified help. Compare its behavior at generous altitude before relying on familiar reactions close to the ground.
Don't combine a new canopy model, smaller size, unfamiliar drop zone and difficult conditions merely to save time. That leaves too many new variables to understand at once.
There is no need to downsize to make progress. Learning more about your current canopy—or choosing a different design at an appropriate size—may better serve your actual goals. We will look at the progression decision itself in Chapter 3.
2.8 How to make a useful comparison
Before you discuss a purchase, write down what you want to improve. Avoid vague objectives such as more fun or more performance until you can explain what they mean in flight.
A useful discussion with your instructor or canopy coach might compare:
What can you already do reliably on your current canopy, including ordinary and less-than-perfect landings?
Which characteristics of that wing genuinely limit the kind of jumping you do?
Could coaching, more practice or better planning address the limitation without changing equipment?
If a different canopy is appropriate, which one major characteristic are you changing, and how will you learn its behavior?
Is the proposed wing suitable for you now, in the conditions and landing areas you actually use?
A manufacturer's specifications, suitable demo opportunities and observed flying are useful evidence. So are the opinions of instructors who have actually watched you land. A seller's enthusiasm and a friend's jump count are not substitutes.
Where we go next
You've learned how to compare aircraft characteristics with your present skills and real flying environment. The next question is about the decision to change: how do you recognize readiness, how should you introduce a change, and why can progress mean staying on the same wing or even moving to a larger one?
That's the subject of Chapter 3 — Downsizing and Progression.
PART III / CHAPTER 03Part III · Equipment & progression
3. Downsizing and Progression — What Are You Actually Ready For?
You've chosen a canopy that suits your current flying. You've learned its ordinary behavior, perhaps attended a course, and started landing more consistently. Sooner or later somebody asks:
“When are you going to downsize?”
Notice the assumption hidden in that question: that moving to a smaller canopy is the next step and that the only thing to decide is when.
But smaller is not a graduation level. Canopy progression means becoming a more capable pilot. Sometimes a change of wing follows. Sometimes the best decision is to keep flying the one you have.
3.1 A smaller canopy is not a reward for jump numbers
A jump count tells you how many jumps are recorded in a logbook. It doesn't tell us how well you plan a descent, judge an alternate landing area, manage traffic, or flare after a less-than-perfect approach.
Consider two jumpers with the same number of jumps. One has made frequent jumps on a familiar canopy, practiced deliberately and reviewed landings with a coach. The other has jumped intermittently, changed equipment often and mainly focused on freefall.
The numbers match. Their canopy experience may not.
Jump count is context, not evidence of demonstrated readiness on its own. The recommendations and rules of a national organization or particular drop zone may set additional limits; those requirements still apply where you jump. Here we're discussing the piloting judgment behind the choice, not replacing local rules with a universal table.
3.2 What has actually improved?
Remember Part I: a canopy has several control methods, a flight cycle and stall and recovery limits. Remember Part II: every canopy shares airspace, and a good pilot needs to predict conflicts and land with options remaining.
Those chapters give us a more useful picture of progress than a new size printed on a label.
A pilot who is considering changing equipment should be able to demonstrate, consistently and to the satisfaction of an appropriate instructor or canopy coach, that they can:
fly a predictable descent and landing pattern in ordinary traffic;
make safe landing-area choices, including when the preferred area becomes unsuitable;
understand and use the appropriate normal controls on their current canopy;
recognize the wing's slow-flight behavior, recovery and limitations through coached training;
complete controlled landings in the range of conditions they are actually qualified to jump;
use a trained PLF rather than forcing a stand-up landing;
explain their own errors and respond to feedback, rather than simply counting successful touchdowns.
This is not a self-certification checklist or an invitation to prove skills with low-altitude maneuvers. Some essential canopy-emergency exercises are for instructor-supervised altitude training. Your coach should assess the quality and repeatability of your decisions, not one impressive landing.
3.3 The difficulty of the bad day
It is tempting to choose a canopy based on your best recent landings: light wind, a familiar field and a clear approach.
But an independent jumper must also deal with an awkward spot, unexpected traffic, a revised landing pattern or an unfamiliar alternate. A canopy that consumes more altitude and time during every decision can magnify a problem you would have managed calmly on your previous wing.
Ask a tougher question:
Can I fly this canopy well when the jump is ordinary but the landing plan is not perfect?
That does not mean seeking out bad conditions to test your ability. It means that equipment progression should be built on reliably demonstrated skills and conservative judgment, not on a flawless day that happened to go well.
3.4 Change one significant variable at a time
Downsizing often changes wing loading, speed and physical dimensions together. Switching model or planform can also change trim, opening characteristics, roll response, brake range and recovery.
Making both changes at once makes it difficult to understand what caused a new behavior, and it may compound the demands on the pilot. A conservative progression commonly separates size changes from design changes.
For example, moving to a different canopy model at approximately the same suitable size may already require learning a new aircraft. It is not automatically a smaller step than changing size within a familiar model.
A similarly labelled canopy is not necessarily identical in flight. Discuss the actual proposed change with your coach and the manufacturer's guidance before treating it as minor.
3.5 A suitable progression may include staying put—or going larger
Perhaps you have made many jumps on your current wing. It opens reliably, you fly predictable patterns, and your landings are controlled.
There may be no problem to solve by downsizing.
You might still be improving your accuracy, glide judgment, flat turns or traffic management. You might be returning from a layoff. You might be visiting a drop zone with tighter landing areas or different conditions. You might simply prefer having more time to make decisions.
Keeping the same canopy, or deliberately choosing a larger and less demanding one, can be a skilled decision. Equipment does not have to become faster for the pilot to become better.
3.6 The “I'll only try it once” problem
Chapter 2 described the temptation to buy a smaller canopy for a future skill level. That temptation often reappears when someone offers a demo, a borrowed rig or a convenient one-time jump.
The question is no longer whether you can afford the wing. It is whether you are prepared for its flight characteristics and whether the whole system fits and is suitable.
A landing that happens to work is a poor way of discovering the answer. If a change is justified, plan it with a qualified instructor or coach and an appropriately inspected, compatible equipment setup—rather than asking the first jump to decide whether you were ready.
3.7 Your first jumps on something different
Even a suitable, planned equipment change needs a familiarization plan. Don't combine a new canopy with an unfamiliar drop zone, challenging wind and complicated group traffic simply because the opportunity is available.
Before jumping, review the manufacturer's instructions and operating limits, confirm compatibility and fit, and agree on an appropriate initial flight and landing plan with your instructor or canopy coach.
Allow enough altitude and clear airspace for any approved high-altitude familiarization. Observe how the canopy turns, glides, slows and recovers within the planned exercises. Choose suitable landing conditions and leave generous margins. Review the results and adjust the plan before progressing further.
A different canopy may require a different flare technique, control timing or emergency response. Learning those differences is part of transitioning—not something to discover during the landing.
3.8 Currency can change the answer
Imagine that your coach considered a new canopy suitable after months of regular practice. You then take a long break before making the planned change.
The original assessment may no longer describe your present ability. Your recent habits, confidence and response speed need reassessment. The same applies if you have been jumping often but rarely under the canopy you intend to fly.
Readiness is not a permanent certificate. Part III Chapter 4 will examine currency more fully, including returning after a layoff.
3.9 A decision conversation worth having
Instead of asking your instructor, “How many jumps until I can downsize?”, try asking:
What evidence would demonstrate that I am using my current wing well? Which weaknesses should I improve before changing anything? What is the specific benefit of the proposed canopy for the jumping I actually do? And how would we introduce that change without losing safety margin?
Those questions produce a learning plan. A particular jump number by itself does not.
Where we go next
Readiness is not only a question of what you have learned. It is also a question of what you have practiced recently. Chapter 4 explores currency: how jump frequency, time away from the sport, specific canopy familiarity and changing conditions affect the pilot you are today.
Further reading
Performance Designs — Downsizing — choosing when and whether to move to a different canopy, including the temptation to buy equipment before you're ready.
PART III / CHAPTER 04Part III · Equipment & progression
4. Currency — Experience That Needs Maintaining
Two skydivers each have 200 jumps. One has been jumping regularly this season, most recently last weekend. The other made their last jump many months ago.
Their logbooks record the same amount of lifetime experience. But if both stand beside the aircraft tomorrow, do they have the same readiness?
Probably not. The second jumper may remember the procedures perfectly—and still find that the details of timing, perception and decision-making no longer feel as familiar.
This is currency: not simply what you have done, but what you are prepared to do now.
4.1 Experience and currency are not the same
Experience is accumulated. Currency must be maintained.
A jump you made years ago contributes to your understanding, but it cannot guarantee that your present habits and reactions are sharp. Conversely, making several jumps recently does not prove that every skill has been practiced well.
Think of someone who drives every week on quiet rural roads. They are current at driving, but that does not automatically make them practiced in heavy city traffic or on icy roads. Skydiving has similar distinctions.
The practical question is not just “How many jumps do I have?” It is “What have I done recently, and how closely does it match the jump I am planning?”
4.2 Currency has several layers
It helps to distinguish three overlapping kinds of readiness.
General skydiving currency. You are familiar with aircraft procedures, the normal jump sequence, altitude awareness, deployment and emergency procedures. You can carry out those tasks without becoming overloaded by ordinary details.
Equipment currency. You know the particular harness/container, main and reserve controls, deployment system and canopy you are using. A different rig or a different canopy may require fresh familiarization even if you have been jumping regularly.
Conditions and task currency. You have recently dealt with the type of jump, traffic, landing area and conditions you now intend to fly. A calm day at your home drop zone is not equivalent to unfamiliar terrain, busy mixed traffic or a demanding wind situation.
These layers can change independently. You may be current in freefall but rusty under canopy, or comfortable on your own wing but unfamiliar with a rental system.
4.3 What fades during a layoff?
A layoff does not erase everything you know. Your conceptual understanding may remain strong. But some of the abilities that make a skydive feel routine depend on practice.
Examples include recognizing a changing ground track, judging your position in the landing pattern, timing a flare, operating unfamiliar equipment and responding promptly to an emergency.
The most dangerous consequence may be subtle: your confidence can return faster than your precision.
You recognize the drop zone. You remember the words of the emergency procedure. You may even feel excited to be back. None of those proves that your current canopy judgment is where it was before the break.
There is no single number of days after which everyone loses the same skills. The length of the break, previous experience, jump frequency before the break and the complexity of the planned return all matter.
4.4 Returning after time away
Imagine you have not jumped for several months. A friend invites you to join a busy load at a new drop zone and offers you a rig you have not previously used.
That combines several changes at once: currency, equipment, airspace and environment.
A better return begins before boarding. Contact an appropriate instructor or drop-zone staff member, establish the applicable recurrency requirements, and arrange whatever refresher training and supervision your experience and layoff call for. This includes practical emergency-procedure review, equipment familiarization, and canopy-flight and landing planning—not merely remembering how to exit.
Then keep the first jumps back deliberately manageable. Where practical and approved, use familiar, suitable equipment and uncomplicated conditions. Revisit the landing-area briefing, planned traffic flow and alternate landing options. Have your first return jumps reviewed before adding further complexity.
Depending on the circumstances, a larger or more conservative canopy may be appropriate while rebuilding proficiency. That decision belongs in a conversation with a qualified instructor or coach, taking the actual equipment and pilot into account.
Some national organizations publish specific recurrency intervals and procedures. Those requirements depend on your governing organization and drop zone. The intervals are minimum administrative triggers, not proof that a particular person is safe to attempt a demanding jump.
4.5 Being current on this canopy
A jumper might make many skydives in a month, but only a few on the canopy they now intend to fly.
That distinction matters. Canopies differ in steering response, brake range, recovery, glide and flare. Familiarity with a different wing—or with a similar wing years ago—does not make the new one automatically familiar.
Remember the flight-cycle model from Part I. You may understand why a canopy surges after brake release, but the size and timing of that surge still need to be learned on the wing you are actually using.
If you return after a break, it may be wise to postpone a planned downsize or canopy-model change. Regaining proficiency and changing aircraft are different tasks. You do not need to combine them.
4.6 Recent jumping can still leave gaps
Currency is not the same as being willing to jump in every condition.
Suppose you have made twenty recent jumps, all in light wind at a familiar field. You may have excellent currency for that environment. It does not mean you have developed the judgment or practiced responses appropriate for every wind, landing area or level of traffic.
You do not need to seek out difficult conditions to “build currency.” Instead, use qualified coaching to identify relevant gaps, and expand the range of situations you can manage only when your skills and local procedures support doing so.
Some days, maintaining good judgment means not jumping. Turning down unsuitable conditions doesn't erase the useful experience you already have.
4.7 Build currency deliberately
Regular jumping helps, but repeating the same skydive without reflection can leave weaknesses unnoticed.
A simple habit is to choose one ordinary, safe observation goal for a jump: for example, accurately predicting your holding-area arrival, noticing how winds change the ground track, or reviewing your flare with video. Keep actual in-air exercises within the plan approved by your coach.
After landing, ask what went as expected and what surprised you. Record important observations, especially after a gear change or long break. If you fly several different systems, remember that each may need its own familiarization.
This is not about collecting practice drills. It is about making recent experience informative.
4.8 The decision you make before the next jump
Imagine two invitations after an extended layoff.
Option A: A straightforward return at a familiar drop zone, using suitable equipment and an instructor-agreed refresher plan.
Option B: A complicated jump with unfamiliar equipment because friends are visiting and you don't want to miss out.
Which one helps you rebuild the ability to enjoy many more jumps afterward?
Currency is ultimately a decision-making skill. It asks you to choose a jump suited to the pilot you are today, even when the pilot you remember being was more practiced.
Where we go next
A return to regular jumping also depends on the condition and configuration of your equipment. Chapter 5 will explore inspections, packing, maintenance boundaries and the owner's responsibility to involve a qualified rigger when necessary.
Further reading
USPA SIM — Currency Training — a useful reference for knowledge and practical skills to refresh; follow the requirements applicable at your own drop zone and in your jurisdiction.
USPA — Currency Training: It's Not Just Another Jump — discusses returning after a layoff, refresher training and the value of a deliberate re-entry plan. USPA-specific examples are illustrative, not universal rules.
PART III / CHAPTER 05Part III · Equipment & progression
5. Owning and Caring for Your Equipment
You have bought a rig that fits you, with a main canopy appropriate to your skills. A rigger has checked the system, you know the handles and emergency procedures, and you are ready to jump it.
What does owning it actually mean?
It means more than storing it in your gear bag and paying for reserve repacks. Over time, fabric wears, lines change, hardware collects dirt, and small problems can develop between professional inspections. A good owner learns to recognize the condition of their equipment and to notice when something is different.
But there is an equally important skill: knowing when not to touch something yourself.
This chapter is about understanding, inspecting and caring for a parachute system—not learning to become a rigger from a book.
5.1 One system, several jobs
Think of your equipment as several connected systems rather than one backpack.
The main canopy must deploy, inflate, fly and land properly. That includes the fabric, suspension and steering lines, slider, links, risers and deployment components.
The harness and container must hold you securely, keep the parachutes properly contained and allow the intended deployment and emergency procedures. Hardware, stitching, closing loops, pins, flaps and handles all have jobs to do.
The reserve system is a separate emergency parachute system with its own components, inspection and packing requirements. Depending on the rig, it may interact with an AAD (automatic activation device), RSL (reserve static line) or MARD (main-assisted reserve deployment system). We introduced these systems earlier; your specific installation must be understood from its manuals and your practical training.
A part can look small and still be critical. The condition of a closing loop, for example, can affect whether a container remains closed until deployment. An incorrectly assembled release component can affect your ability to cut away.
The whole system matters, including the connections between parts.
5.2 Your pre-jump equipment check
You probably learned a gear-check sequence before you gained your license. Ownership does not replace that routine; it makes you more responsible for understanding why each item is checked.
A systematic check should cover the relevant parts of your actual rig, including:
Harness fit and security: chest and leg straps, hardware, webbing condition and correct adjustment.
Handles: main-deployment, cutaway and reserve handles correctly positioned, secure and accessible.
Release and assistance systems: three-ring assemblies, cables and the installed RSL or MARD configuration, as applicable.
Containers: main and reserve closing arrangements, visible pins, loops, flaps and the intended routing of the main bridle.
Safety and documentation: appropriate AAD status and settings, reserve packing documentation and applicable inspection dates.
Personal equipment: helmet, altimeter, accessories and anything that could interfere with a handle or deployment.
This is not a universal checklist in a prescribed order. Learn the model-specific sequence approved by your drop zone, instructor and manufacturer, including what can be checked with the rig on or off your back. Check again at the points your training requires, especially after handling or moving the rig in the aircraft.
The goal is not to glance at familiar shapes. It is to recognize whether each item is correct for this system.
5.3 A gear check is not a periodic inspection
A normal pre-jump check answers: Is this system correctly prepared for the next jump?
A periodic inspection asks a different question: Is the equipment still in suitable condition?
As you learn from a rigger, look for changes such as:
frayed, damaged or abnormally worn webbing, stitching, loops or line attachment areas;
unusual wear or damage around hardware, grommets, cutaway components and risers;
damage to canopy fabric, seams, slider, suspension lines or steering lines;
pilot-chute, bridle, deployment-bag or closing-component problems;
contamination by sand, dirt, water, chemicals or other substances;
anything that looks different from the manufacturer's correct configuration.
This is not an invitation to diagnose every defect yourself. Identifying something suspicious and refusing to jump until it is assessed is already a useful skill.
A professional inspection during a reserve repack is valuable. It does not replace a jumper's routine observations between repacks.
5.4 Packing — understand the result, not just the folding sequence
Packing is often one of the first equipment tasks a skydiver learns. At first it may feel like a complicated series of folds, twists, stows and closing steps.
The underlying job is simpler to describe: arrange a known-good main parachute and its deployment components so that they can leave the container and deploy in the intended sequence, without introducing twists, snags, abnormal resistance or damage.
The details differ between canopies and containers, so this handbook will not prescribe a universal packing method. Use practical instruction and the manuals for the equipment you are packing.
As you learn, understand the purpose of several important parts of the process:
Inspecting as you pack. Packing provides a chance to see fabric, lines, links and deployment components. Finding a problem before you close the container is more useful than making an immaculate-looking pack job around it.
Keeping the system organized. Suspension lines, steering lines, slider and canopy must remain arranged according to the approved method. The aim is to avoid introducing twists, misrouting or entanglements.
Managing deployment components. The deployment bag, line stows or their alternatives, pilot chute, bridle, closing loop and pin work together. Their configuration must match the system's instructions.
Closing correctly. A container that merely looks neat is not necessarily correctly closed. The position and condition of the closing loop, pin, bridle and handle matter.
If you lose track of a step, find damage, or discover that the result does not match the manual or what you were taught, stop and ask a qualified person to help. Do not solve an unfamiliar problem by guessing or borrowing a technique from a different rig.
5.5 Care after landing and between jumps
Ordinary jump days expose equipment to sunlight, dirt, moisture, abrasion and repeated handling.
After landing, notice if the canopy contacted rough ground, bushes, fences, water, mud or chemicals. Look for obvious damage or contamination before the next pack job. If something unusual happened during deployment or landing, record it and discuss whether inspection is needed rather than treating it as a story to tell later.
Between jumps, keep the gear in a suitable, dry, clean environment, protected from excessive heat, direct sunlight, sharp objects and chemicals. Don't leave it compressed in a hot vehicle or stored damp for extended periods. Follow the relevant manufacturer's recommendations for drying, cleaning and storage.
Do not assume household cleaning products, lubricants or solvents are harmless to parachute materials. Cleaning or treating a component incorrectly can create a worse problem than the dirt you were trying to remove.
A rig is built to be used, not kept pristine in a display case. Reasonable wear is expected. The task is to notice when ordinary wear becomes a serviceability question.
5.6 What may an owner do, and what belongs to a rigger?
There is no worldwide rule that grants every licensed skydiver the same maintenance privileges. Legal requirements vary by country, and manufacturer instructions and equipment-specific procedures matter.
In some jurisdictions, a trained owner may perform particular tasks on a main parachute—such as certain packing, closing-loop or cutaway-system maintenance tasks—subject to the applicable rules and instructions. That does not make every alteration, repair or reassembly an owner task.
Reserve packing, reserve repairs, harness or container repairs, changes to structural stitching, component alterations and work on safety-critical assemblies commonly require appropriately qualified personnel or manufacturer involvement. Exactly who may do what depends on local regulations and the equipment.
A useful practical boundary is:
Observe and check: know what correct assembly and ordinary condition look like for your system.
Perform only approved, learned tasks: if a task is within your authority, follow the exact manual and training you received, and use appropriate oversight where required.
Stop and refer: if it involves a reserve, structural repair, uncertain rigging, incompatible components or an unfamiliar fault, involve a qualified rigger or manufacturer before jumping.
Do not treat online videos—even good ones—as authorization to work beyond your competence.
5.7 Maintenance records and service information
Your rig has an equipment history. Keep it understandable.
Know the relevant make, model and serial numbers for the main, reserve, container and installed devices. Keep records of reserve repacks and inspections, known deployments, repairs, component replacements and unusual events. If you bought used equipment, retain the history you received and record gaps rather than inventing certainty.
Manufacturers may publish service bulletins (notices requiring or recommending inspections, changes or other actions) or manual updates. Learn where to check the information relevant to your system, and ask your rigger to help interpret it.
An AAD may have its own inspection, battery, service-life or maintenance requirements depending on model and date of manufacture. Check its actual manual and status; do not assume another jumper's device works the same way.
5.8 After a malfunction, reserve ride or unusual event
An equipment problem does not necessarily end when you land safely.
After a cutaway or reserve deployment, parts may be missing, contaminated, stressed or damaged. Even if everything looks fine, there may be inspections, servicing and repacking requirements before the system is returned to use.
Secure the equipment and record what happened while the details are fresh. If possible, keep recovered components and pass relevant observations to the rigger or manufacturer. Do not assume that simply reattaching a main and packing it makes the rig ready for the next jump.
The same caution applies after an unusual hard opening, snag, drag, water landing or other event that could have affected equipment. The appropriate response is assessment of the particular system, not a universal repair recipe.
5.9 Recognizing when to stop
Imagine you're packing after a normal jump. You notice a closing loop that looks worn, a line that seems different from the others, or an unfamiliar component position.
You have friends waiting for the next load. Someone says, “It's probably fine; just get it packed.”
The useful question is not whether the next jump is important to you. It is whether you have established that the equipment is correct and serviceable.
Sometimes the most competent equipment decision is simple: do not jump that rig until a qualified person has checked it.
This is the same judgment we have developed throughout the handbook. The good decision is often the one that preserves options before a problem becomes urgent.
The final connection
Part I explained how your canopy flies. Part II showed how to use it among other pilots and changing conditions. Part III asked you to choose an appropriate system, progress honestly, maintain currency and take responsibility for the equipment you use.
These are not separate qualities. You cannot make a good canopy decision with unsuitable equipment, and good equipment does not compensate for poor flying or judgment.
The aim is to become the jumper who understands their aircraft, makes deliberate decisions and knows when to seek help.
USPA SIM — Equipment — equipment-check and maintenance guidance that includes U.S.-specific regulations and rigger privileges; follow the rules that govern your operation.
CYPRES — Maintenance Information — an AAD-specific example. Service policies depend on model and date of manufacture; consult your own AAD manufacturer's documentation.
Air movement relative to the wing, broadly opposite its flight through the air.
Flight path
Direction of actual movement of canopy-pilot system.
Heading
Direction the canopy's nose points.
Pitch / roll / yaw
Three rotations: pitch about a side-to-side axis (nose up/down), roll about a front-to-back axis (bank), and yaw about an approximately vertical axis (nose left/right).
Glide ratio
Horizontal travel per unit altitude lost in an approximately steady flight condition.
Wing loading
Total suspended weight (jumper plus equipment) relative to canopy area; units and conventions vary, so always specify them.
Trim
The canopy’s normal configured flight geometry, often discussed as how it flies with the toggles released. Line configuration and canopy design influence trim.
Chord line
An approximate line from the front to the back of a wing section; a reference for discussing angle of attack.
Surge
A noticeable forward/pitch movement of the canopy relative to the pilot, such as after rapid brake release.
Flight cycle
Dynamic response of wing and pilot to control input and their return toward equilibrium.
Recovery arc
Return path and transition from a diving state toward normal stabilized flight.
Static / quasi-static stall
Stall approached through relatively slow changes in aerodynamic condition.
Dynamic stall
Transient unsteady stall associated with rapid effective angle-of-attack changes; skydiving usage is not perfectly uniform.
Flat turn
Heading change intended to limit diving and excessive altitude loss, commonly using controlled braked flight.
Coordinated turn
Turn where roll, yaw, and flight path are made to work together with minimized unwanted sideslip/skid.
Sweet spot
Useful flatter flight-path phase of a flare, not a universal toggle position.
PLF
Parachute landing fall, a practiced technique for distributing touchdown impact.
AGL
Height above ground level. All training altitudes in any later exercise plans must state the reference convention.
Canopy airmanship
Planning, observing and managing flight relative to traffic, terrain, weather and available altitude.
Opening corridor
Region where groups on the load are expected to continue freefall and deploy; its actual shape depends on the jump plan.
Holding area
Locally designated region used to descend and position for an orderly landing-pattern entry.
Horizontal separation
Distance or relative displacement between canopy ground tracks; changes as canopies move.
Vertical separation
Altitude difference between canopies; changes with their relative descent rates.
Arrival sequencing
Planning where and when canopies reach pattern-entry and landing points to maintain useful spacing.
Traffic stack
Informal term for canopies at different altitudes converging toward a landing area; not a fixed ordering.
Pattern entry
Transition point or region where a canopy joins the locally established landing pattern.
Visual concepts added in edition 0.5
Optical flow: apparent movement of fixed environmental features across the pilot's visual field during motion. A nearly stationary ground reference during a stable glide may approximate the current projected touchdown point; this is not guaranteed after control or wind changes.
Pitch attitude vs flight-path angle: pitch describes the wing's orientation; flight-path angle describes its actual direction of travel. Angle of attack relates the wing's chord/reference direction to the airflow, not directly to the horizon.
Heading vs air-relative track: where the wing points and where it moves through the surrounding air are distinct; a drift analogy can help visualize a mismatch, but canopy turns involve aerodynamic forces and banking.
REFERENCE APPENDIX BReference library
Appendix B — Illustration Index
Figures are numbered in the order they first appear in the handbook. Some are existing editable diagrams; others are placeholders for future illustration work.
Figure
Illustration purpose
Notes for artwork
01 · Big picture
Real photograph of an inflated ram-air canopy, lines and suspended pilot
SkydivePhoto / Wikimedia Commons, CC0 1.0; do not infer equipment specifications from a single photograph.
02 · Forces on a descending wing
Lift, drag, weight, relative wind, and flight path
Qualitative only; check lift perpendicular to the air-relative path and load depiction.
03 · Air versus ground
Constant airspeed in headwind, crosswind and tailwind
Use vector addition correctly; distinguish turn transients.
04 · Angle of attack
Chord line, relative airflow, and the angle between them
Distinguish angle of attack from pitch attitude; avoid implying a rigid wing.
05 · Deep-brake release
Four-frame early flight cycle anchored in familiar training experience
No fixed times, distances or encouragement to snap toggles near ground.
06 · Pitch, roll, yaw
Three orthogonal rotations in side, front and top views
Stylized wing; not flight-path axes or a rigid-wing dynamic model.
07 · Control map
Toggle, front/rear riser, harness mechanism
Use accurate line groups for the illustrated system.
08 · Toggle deformation
Full flight, symmetrical toggle input, and asymmetrical toggle input
Show trailing-edge deflection clearly; photo or illustration acceptable.
09 · Rear-riser deformation
Neutral, symmetrical rear-riser input, and asymmetrical rear-riser input
Emphasize broader rear-wing deformation rather than only line movement.
10 · Front-riser deformation
Neutral and symmetrical front-riser input
Show front line-group displacement and steeper diving path.
11 · Harness input
Neutral and left/right weight-shift examples
Show load shift through harness / leg straps and resulting roll tendency.
12 · Car drift / coordinated turn
Heading versus travel direction in yaw
Coordination involves more than eliminating slip; canopy not a car.
13 · Pitch drift / angle of attack
Pitch attitude versus path, and the transient aspect of dynamic stall
Orientation mismatch alone does not constitute dynamic stall.
Make assumptions and visual reference geometry explicit.
15 · Flare sequence
Flight-path flattening and energy loss over time
Do not suggest a fixed flare height or hand position.
16 · Touchdown continuation
Running flare, PLF, and ground depowering as separate stages
Confirm pose and sequencing with qualified instructors.
17 · Four dimensions of traffic
Ground track, relative altitude, and projected time of arrival
Never imply fixed separation minima.
18 · Converging tracks
Different opening positions converge at pattern entry
Show future conflict, not just current distance.
19 · Holding area and winds
Dynamic holding-area location relative to pattern and opening corridor
Site-specific map must be briefed locally; winds vary with altitude.
20 · Shared landing pattern
Illustrate conventional downwind/base/final, pattern entry and timing of two canopies
No universal altitudes or mandated local handedness.
21 · Traffic conflict forecast
Show relative ground tracks converging toward the same base-to-final corridor
Do not show a universal avoidance maneuver.
22 · Decision windows
Early descent with options, pattern commitment, low approach
Avoid using fixed altitude thresholds; local procedures govern.
23 · Alternate-field selection
Compare approach corridors and hidden hazards across candidate fields
Ground truth required; no field is guaranteed safe from overhead view.
Possible additional diagrams (not numbered yet)
Coordinated vs flat turn — Different objectives and flight-path shape. Don't imply flat equals zero altitude loss.
Recovery arc — Heading finished versus dive still recovering. No performance landing initiation altitude in artwork.
Static vs dynamic stall — Gradual vs rapidly changing aerodynamic state. Avoid presenting end-of-flare and dynamic stall as synonyms.
The currently drawn vector illustrations are Figures 02, 05, 06, 12, 13 and 14; the rest are planned illustration slots.
REFERENCE APPENDIX CReference library
Appendix C — References and Further Reading
This appendix gathers sources used across the handbook. It is organized by subject rather than chapter or manuscript revision. Part III also provides focused Further reading lists at the end of each chapter. These publications support learning and verification; they do not override the manufacturer's instructions, the actual drop zone's procedures, or the regulations that apply to your skydiving.
USPA — The Front Office: Stalls — parachute-specific discussion of chord line, relative airflow, angle of attack and stall awareness.
USPA — Canopy Piloting (SIM 5-9) — flight cycle, canopy performance, control response, wing loading and progression; also relevant to traffic management.
Precision Aerodynamics — Flight Manual, p. 48 — includes Brian Germain's description of the trailing pilot-chute bridle as a qualitative turn-coordination cue. See Part I, Chapter 10 for its limitations.
USPA — Chapter 4 recommendations — landing priorities, canopy incidents and emergencies; consult the relevant subsection rather than treating the whole chapter as a single procedure.
Right-of-way conventions, opening corridors, landing directions, pattern altitudes and other operational details must be checked against the procedures at the actual drop zone. The handbook's flight-path figures are conceptual rather than site charts.
AOPA — Look Out, Here Comes the Runway — airplane-training analogy for optical flow and a visually stable projected landing point, not parachute-specific landing guidance.
CYPRES — Maintenance Information — model- and manufacture-date-dependent AAD maintenance information. Check your actual AAD's current documents.
For your own equipment, consult the current manuals, compatibility data, service bulletins and qualified riggers for the exact main, reserve, harness/container and AAD models in use.
This source collection is supplementary. No external association's guidance automatically takes precedence over local procedures, applicable regulations, or equipment-specific manufacturer instructions.